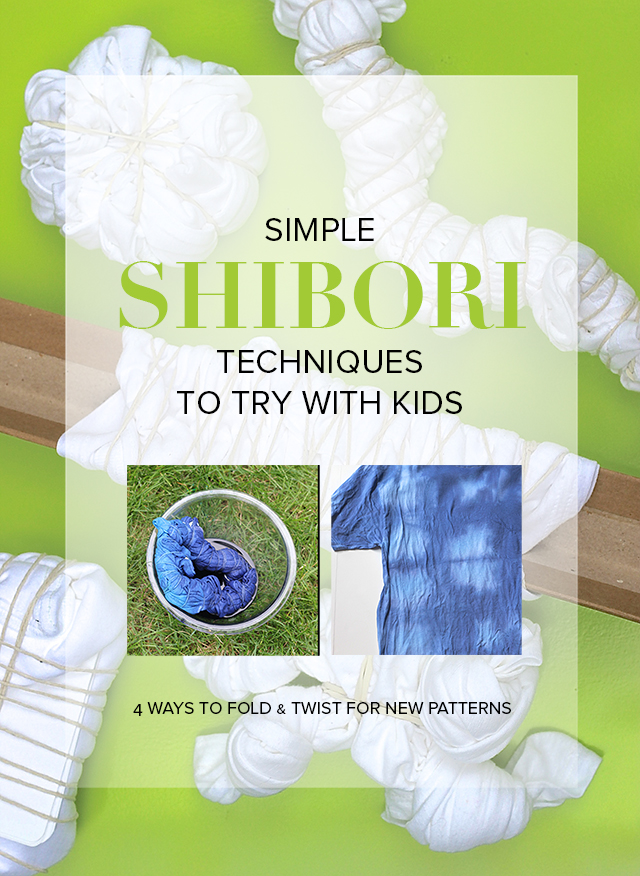
Bring fresh pattern and process to tie dying with your children through the ancient art of Shibori! A simplified process that's fun to follow.
Every once in a while (pretty close to once a year), I work up the momma guts to brave the world of fabric dye with my children. My excitable young artists are drawn like happy moths to the flame of the permanent, color-rich saturation that only a dye can create. My thought this year? Let's go all in. Enter the beauty and variation of shibori.
Have you heard of shibori? I was first introduced in this post, and I recall admiring the beautiful results of folding, wrinkling, and twisting. Shibori dates back into ancient Japanese art forms of the 8th century using indigo powder to design patterns.

Shibori is an ancient Japanese technique used to dye and create patterns on fabric. Take the basic process and simplify it for a fun outdoor craft with the kids!
Using the basic concepts of shibori and capitalizing on modern liquid fabric dyes, my kids and I made some simple and modern shibori shirts. To give this a go, make sure you have these supplies:
- White cotton shirts
- Fabric dyes (squirt bottle versions work really well for kids)
- Rubber bands
- Cardboard tubes and squares
- Twine/rope
- Gloves and clothes you don't mind also dyeing
- Glass bowls
I highly recommend using an outdoor space to create when possible. We chose a sunny, warm day in our backyard, and we definitely dyed our grass!! So be prepared that when you're working with kids (or clumsy parents, eh hem), you'll have permanent spills.
We tried four different techniques to find very different results. Hover over each photo to peek into the process. Follow the instructions on your fabric dye to ensure the desired effect. For all of our patterns, once the dye was fully applied, we wrapped the entire shirt (plus the tube in one case) in plastic wrap and set it aside for 24 hours. After a full day we unwrapped the shirt, rinsed and untied the shirt until water ran clear through it. We then hung them over a drop cloth to drip dry. Be sure that you wash these shirt separately, at least initially to avoid color bleeding.
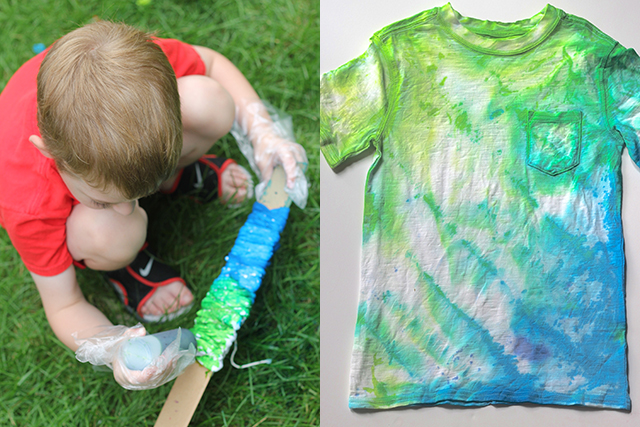
Wrap t-shirt on a diagonal around a cardboard tube. Secure twine in a criss cross fashion all the way down the tube. Scrunch shirt as you go.
THE WRAPPED TUBE
My 5-yo used two different dyes (one starting on each end) to make a very cool and unintentional ombre effect. The wrapping and folding of the shirt allowed the color to saturate on the edges and form stripes. This technique was a great one for young hands. With just a thin layer of material around the tube, my son could see and saturate the fabric as he wanted to. No mystery involved there, and it made for one happy camper in the end.

Bring fresh pattern and process to tie dying with your children through the ancient art of Shibori! A simplified process that's fun to follow.
THE TWIST AND TIE
This is a fun design for the more adventurous soul because the unpredictability brings its own magic. To create this feel you tie the four corners of the shirt and twist each until they meet in the middle. Since the bound shirt is pretty thick be sure to saturate this one in dye for a while.

Take each corner of the shirt and tie a knot. Once you have all four knots, twist each knot until they meet up in the center. Keep the bundle tight together with overlapping rubber bands.
THE FLAT FOLD
Create a square from cardboard. We made ours 4 inches and then folded the entire shirt around it. We then bound the bundle with crosshatching rubber bands for a truly unique final product!

Create a square from cardboard. We made ours 4 inches and then folded the entire shirt around it. We then bound the bundle with crosshatching rubber bands
SPIRAL ROUND
This one is hippy tie dye meets shibori. This is a classic tie dye technique that works particularly well for adding a rainbow of colors. My 8-yo could easily see the sections that she wanted to color and could put them in the order she wanted them to spin. The spiral round becomes a large ball of thickness so be sure to soak the shirt thoroughly with dye for a bright finished product.

The classic tie-dye pattern derived from shibori methods. Find your center point, and twist the entire shirt to create a spiral-galaxy-like bundle. Section off areas to focus dye by adding 2-4 rubber bands.
We all loved exploring the varieties of possibilities these new methods offered! Having you given Shibori techniques a try? I'd love to see what you created!