Posts in Kids
Rock the Clock game
Make this fun learning game from rocks! Help your children learn how to tell time, figure out how much time has elapsed, and discover the world of timezones. Perfect summer project.

Make this fun learning game from rocks! Help your children learn how to tell time, figure out how much time has elapsed, and discover the world of timezones. Perfect summer project.

We're learning the fun way this summer! And what could be better (or easier) than rocks and some paint? I'm so excited to share with you our favorite new learning activity for preschoolers/K, early elementary, and even middle schoolers.

Sometimes my children stare at an analog clock, trying to read it quickly. It feels a bit like a foreign language since our electronics and nearly every clock in our home is digital. We created this game to help them be able to take on time with confidence and to have some fun with it in the process.

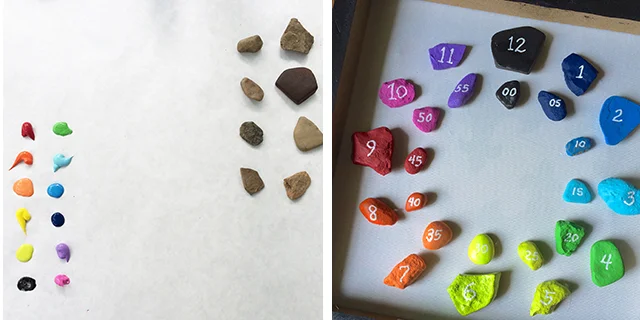
To make a Rock the Clock game, you'll need a square canvas, 24 rocks (12 larger, 12 smaller), rainbow paints, a white paint marker, and craft glue/hot glue. As the backing, I used a canvas I found on clearance at a craft store. Its image is not one that I wanted to hang, but I knew the canvas frame would come in handy. Using the frame like a tray, I painted the edges black to contrast with the rainbow rocks.

Sorting the rocks into two main piles, large and small, I selected one from each pile to paint a shade of the rainbow. Remember that the large rocks will be numbered with hours and the small rocks will have the minute numbers on them. I recommend two layers of paint on your rocks to make sure that the colors are nice and saturated.

Once the rocks are painted and dried, add numbers with the paint marker. Let that dry and then glue the rocks onto the canvas. In the center, you can paint or place a simple circle or press a blob of playdough to hold the hands of the clock. We made our hands from two twigs and painted them in different stripe patterns so that it's easy to talk about the big hand (that's black and white) or the small hand (that's orange and blue).

Make this fun learning game from rocks! Help your children learn how to tell time, figure out how much time has elapsed, and discover the world of timezones. Perfect summer project.

Make this fun learning game from rocks! Help your children learn how to tell time, figure out how much time has elapsed, and discover the world of timezones. Perfect summer project.

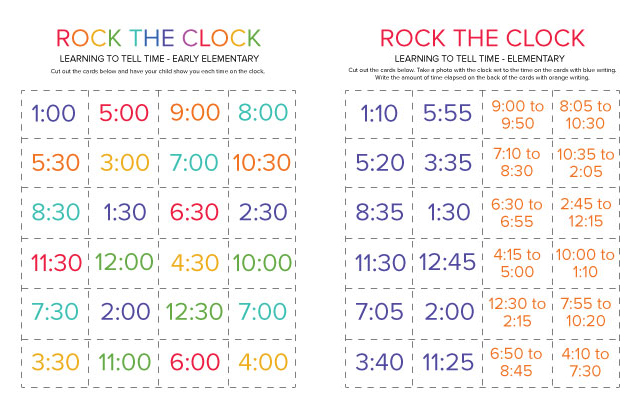
DOWNLOAD ROCK THE CLOCK FOR EARLY ELEMENTARY

For L, our emergent reader, we used the elementary version of Rock the Clock. A stack of cards, with times of o'clock and thirty are an easy way to begin. I sat next to him as he showed me on the clock what the time on the card said. I was amazed how quickly he wanted to move into the quarter hour times because, with the visual of the rocks and the numbers, he understood how the big hand works. Learning is amazing to watch.

Make this fun learning game from rocks! Help your children learn how to tell time, figure out how much time has elapsed, and discover the world of timezones. Perfect summer project.

Make this fun learning game from rocks! Help your children learn how to tell time, figure out how much time has elapsed, and discover the world of timezones. Perfect summer project.

DOWNLOAD ROCK THE CLOCK FOR ELEMENTARY

For C, our new 3rd grader, we made a new set of cards. Her times are set to the 5-minute increment. She wanted to be a bit more independent so I offered her the option of taking a photo of the clock and the card next to each other and sending it to me!

This is a great idea for working parents!! Ask your child to set the clock to the time they woke up and text it to you.

Also, to challenge her further, the second set of cards asks her to calculate how much time has elapsed from a start time to an end time. She can use the rock clock to count through the minutes and hours and write down her time.


DOWNLOAD ROCK THE CLOCK FOR TIME ZONES AROUND THE WORLD

And for M, who wants to travel the world, I adapted this as a learning tool for world time zones. Using the printable map, she can discover new countries and relate to how life might be the same or completely different there. I have a lot to learn on this one, too, so I'm excited to learn side-by-side.

We think we may turn the game into a working clock at summer's end since we can't resist a good rainbow craft, but who knows. Simple tools like this are amazingly helpful to boost learning and take understanding to a whole new level.

Know anyone who might enjoy creating and playing with Rock the Clock? Send this post along!

XOXO, MJ

Painted Terra Cotta Pot Garden
Take a great recipe to the next level! Plant a pot full of the ingredients and add the ingredient list, handwritten on the pot. A fabulous teacher present, too!

Take a great recipe to the next level! Plant a pot full of the ingredients and add the ingredient list, handwritten on the pot. A fabulous teacher present, too!

Summer is the best time to be outside! We love getting to know local plants and flowers and planting our family garden is a highlight of the summer's start. Frequent visits to the nursery for vegetable and herb plants are just a part of our summer ritual. The kids love to touch and to smell each plant, and I love that they are more interested in the meals and dishes we create with the plants that they have grown (bonus!)!

As a fun extension of our usual veggie patch, we decided to make a special garden for one of their new favorite foods - salsa! Tacos, burritos, and guacamole have been added to our menu planning, and the kids expressed interest in making our own version.

Add your favorite recipe with a paint marker and plant a garden just for this dish! Makes a wonderful hostess gift or teacher present.

Add your favorite recipe with a paint marker and plant a garden just for this dish! Makes a wonderful hostess gift or teacher present.

With so many great salsa recipes out there, you likely already have your own blend, but if not, try this one from Lulu the Baker or Cooking Classy's restaurant style. We know that not every ingredient is readily available locally so we put together what we could find.

The supplies are simple on this one: one large terra cot pot, outdoor paint (one that seals the pot for you), a white paint marker, and your plants. Perhaps your garden will be an Italian selection for pesto or a French selection of tarragon. Pick your recipe and then select your plants, keeping in mind that some might need to be transferred as they grow larger.

In our salsa pot, we have roma tomatoes, two cilantro plants, and a few yellow onions. It smells so delish! And it's already brought so much happiness before we even get to the final product. Seeing my children enjoying the gifts of nature is a fabulous part of our 18 Summers Challenge. And M loved making one as a year-end present for her teacher, too!

Give a mini garden of all the best ingredients for a wonderful salsa and write the recipe right on the pot! Great teacher gift!!

Give a mini garden of all the best ingredients for a wonderful salsa and write the recipe right on the pot! Great teacher gift!!

What would you plant?

xoxo, MJ

P.S. Are you joining in the projects we're creating for this summer together? Up tomorrow, a fun game called Rock the Clock. Get those stones ready.

P.P.S. If you want a sneak peek into all that's ahead, including supply lists, subscribe to the Pars Caeli newsletter by adding your email below.

A nature hunt in your backyard

This post is sponsored by Sprout by HP, but the project and thoughts are all mine. Thank you for your support of the brands that support Pars Caeli.

So many wonderful summer, childhood memories can be created right in our backyard. Literally. Though I've lived in multiple locations, I can vividly remember the natural details within the backyards of our homes. One had a grape arbor, one a favorite cement patch and views of cows at pasture, and another the sweet smell of lilacs. A returning summer goal of mine is for my children to spend more time outside, in our yard. I want them to run/jump/climb and to use their broad imaginations to create, and to learn about the natural classroom we have right outside our door.

So, I decided to make a game of it. A scavenger hunt! With three children, ages 5, 8, and 10, I wanted varying levels of difficulty so I decided to make a printable that they could all use.

Create a scavenger hunt out of leaves, branches, and blooms for the backyard. Help your children learn how to identify the environment around them through this fun game!

Create a scavenger hunt out of leaves, branches, and blooms for the backyard. Help your children learn how to identify the environment around them through this fun game!

Here's how it works:

  • The 5-year old gets to take me on the journey as he finds and identifies each of the items.
  • The 8-year old will write down the names of the trees, plants, and flowers on the printable. She'll have to identify what she can from memory.
  • And the 10-year old will learn even more about these natural beauties by looking through our field guides (like the ones below). She's a lover of words and etymology so she's excited to take on some Latin roots.

I went out to the yard with camera and bucket in hand, ready to collect treasures. It's important to me that my children be able to identify local trees, plants, and flowers so I added samples of the varieties that we have in our yard.

For our printable, I used the HP Sprout to make photo-realistic images that I could manipulate quickly. I love creating special projects for my children, but I don't have a ton of time to do so. The Sprout was super helpful on this!

I captured the twelve items, rotated them on the page, and scaled them for a two-column layout. I could see keeping them on the computer, too, so that the kids can make their own pictures with our backyard features.

The HP Sprout helps make any three-dimensional object into a two-dimensional piece of art! We used these natural elements for a scavenger hunt of our backyard.

The HP Sprout helps make any three-dimensional object into a two-dimensional piece of art! We used these natural elements for a scavenger hunt of our backyard.

GET YOUR PRINTABLE HERE.

I'm excited to explore!! We all need to understand the world around us more, and this is a wonderful summer learning game, too.

How do you make the most of your outdoor space?

xoxo, MJ

Other fun options with a nature's scavenger hunt could include taking photos of the leaves and flowers in your yard and printing them out for children to identify and find. You could also have them use the found objects from the bucket to run around and put them back in their natural habitats. This is a great opportunity to talk about each plant and variety!


What would you create with a Sprout?

P.S. Did you see how else we've used our Sprout?

Strawberry Shortcake Stars

It's strawberry season! And picking time is our favorite. Today we're enjoying the sweet flavors of strawberries with a fun take on a traditional strawberry shortcake that leans a bit more to the messy and child-loving side.

Strawberry Shortcake Stars are a treat perfect for July 4th or any star-studded celebration, like the end of great day!

Strawberry Shortcake Stars are a treat perfect for July 4th or any star-studded celebration, like the end of great day!

The kids and I love to bake together so we'll be sharing more recipes like this during the 18 Summers Challenge, and we all love strawberries so this was a win win for us. Not every day is a great baking day, though, (remember those ideas I gave for having success with your kids in the kitchen?) so I waited until L and I had some time to ourselves to create treats for the rest of the family. Give yourself about an hour from start to finish for this recipe and enjoy the mess of flour and dough. It will happen. And the messy will likely be your child's favorite part so do your best to set aside the need to keep tidy.

Take a plateful (or about 4 cups) of sliced strawberries to make a family portion of Strawberry Shortcake Stars.

Take a plateful (or about 4 cups) of sliced strawberries to make a family portion of Strawberry Shortcake Stars.

Preheat your oven to 425ºF. We adapted this recipe for easy strawberry shortcakes from Just A Taste, Here's what you need:

  • 4 C sliced strawberries - we cut ours super small for little mouths and hands
  • 2 T sugar

Mix these two together and set aside while you're making the rest of the recipe.

  • 2 C flour
  • 3 t baking powder
  • 1/2 t salt
  • 1 C heavy cream, plus additional for brushing on shortcakes
  • Sugar for sprinkling on top (optional)

For the whipped cream:

  • 1 C chilled heavy cream
  • 1/4 C sour cream
  • 4 T sugar
  • 1 t vanilla extract
Mix these strawberries and 2 tablespoons of sugar together and set aside while you're making the rest of the recipe.

Mix these strawberries and 2 tablespoons of sugar together and set aside while you're making the rest of the recipe.

Stir together the sliced strawberries with the sugar (a great job for little hands). Set aside. Be sure to take in the delicious smells of fresh berries.

Mixing and kneading are great skills for children to accomplish. Make these yummy Strawberry Shortcake Stars with your kids!

Mixing and kneading are great skills for children to accomplish. Make these yummy Strawberry Shortcake Stars with your kids!

Whisk flour, baking powder, and salt together in a large bowl.

Add the heavy cream. Form the dough into a ball within the bowl and then move to a lightly floured surface for kneading. Not much is necessary, only one or two pounds to be sure you don't have tough cakes.

Roll the dough to about 1/2-inch thick. With a star cookie cutter (we used one 3" wide), cut out shapes and transfer them to the baking sheet. We were able to make 10 stars from our batch. Gently pour less than a teaspoon of heavy cream on each and sprinkle with sugar.

Bake for 15 to 17 minutes or until they're golden brown.

Cookie cutters are handy all year round! Strawberry Shortcake Stars.

Cookie cutters are handy all year round! Strawberry Shortcake Stars.

Let those cool while you put together the cream. Make sure the ingredients here are very cold. We had ours a little warmer and the cream was extra melty but still delicious!

Mix the heavy cream, sour cream, sugar, and vanilla extract with a mixer on high speed. Continue until peaks form.

Strawberry Shortcake Stars are a treat perfect for July 4th or any star-studded celebration, like the end of great day!

Strawberry Shortcake Stars are a treat perfect for July 4th or any star-studded celebration, like the end of great day!

Creating your shortcake is as wonderful as sandwich making. Slice the stars horizontally to create a top and bottom piece. First add a layer of cream, and then 2-3 spoonfuls of strawberries. The amount of cream and strawberries you add makes it more or less a sandwich treat. Some enjoy shortcake with a fork anyway.

This easy recipe for strawberry shortcake is one that you can do with the kids! Find more info on Pars Caeli.

This easy recipe for strawberry shortcake is one that you can do with the kids! Find more info on Pars Caeli.

Little fingers won't be able to stay away from these delicious strawberry shortcake stars, the simple, delicious way to use in-season berries.

Little fingers won't be able to stay away from these delicious strawberry shortcake stars, the simple, delicious way to use in-season berries.

We loved eating these as open face treats, too. This allowed for extra dollops of cream and more heaping helpings of strawberries!

Have you made any strawberry treats this season?

XOXO, MJ

P.S. For those following along with the 18 Summers Challenge, we'll be going on a hunt in nature tomorrow! Printables, printables, printables!!

The Challenge of 18 Summers
Join in a summer's full of activities and childhood joys on Pars Caeli. Every week, new ideas for ages 5-10, with supply lists ready a week in advance for big projects.

Join in a summer's full of activities and childhood joys on Pars Caeli. Every week, new ideas for ages 5-10, with supply lists ready a week in advance for big projects.

"Next year, he's off to college, and this is his last real summer at home. I don't know yet what we're going to do. I feel all this pressure, and I want to make it special, make the most of it."

My oldest is only 10, but I felt that same heart pang. I saw the softness in this mother's eyes--she, the amazing parent of eight children, ranging ages 3 to 18--as we chatted during t-ball team pictures. How do we make the most of the time we have with our children, while they're still at home?

I feel that pang a lot when it comes to childhood summers. I want so much the continual carpe diem experiences for my children. The bliss of chasing butterflies matched with the incredible camp that opens their eyes to new possibilities. The right amount of boredom to find the space to create their own adventures. The time making family memories together and traveling to see new places.

"One day you will wake up and there won't be any more time to do the things you've always wanted. Do it now." - Paulo Coelho

And, much like the mom that I was chatting with, I do put a lot of pressure on myself. I have a feeling I'm not the only one.

So how do we do it? Provide the planning and energy to make memories happen and mix it with the ease and the relaxation to allow spontaneity at its best.

Frankly, I'm not sure. I'll likely stress about it and not do enough BUT nevertheless I'm inviting you into our summer journey to try some bucket list activities, to relive some of the joyful activities of our own childhoods, and to experiment with new projects! For newsletter subscribers, I'll send a supply list every Friday so you can join along and preview future ideas. No worries, most projects will include easy items you have right in your home.

And I want to see what you're up to with your children, from infant to college age. How do you make the most of the summer together? Share your tweets and photos using the hashtag #18summerschallenge, and I'll repost select ideas to help us all!! And don't forget to share and to subscribe to be a part of the best summer of childhood.

We can do this, enjoy our times together and make them memorable. Cheers to a wonderful summer ahead.

xoxo, MJ


Yes Day for your family
What if you answered, "Yes!" all day! Our annual tradition of Yes Day is one that we all enjoy. Consider these 5 reasons to try saying yes again and again.

What if you answered, "Yes!" all day! Our annual tradition of Yes Day is one that we all enjoy. Consider these 5 reasons to try saying yes again and again.

Before you say, "No!", hear me out. Yes Day is a family (made-up) holiday that can bring a lot of laughter and fun experiences to your home.

My children (10, 7, and 5) might even that say “Yes Day” is one of their favorite days of the year. Four years ago when we started the celebration, we thought that Mardi Gras, the day before Lent begins, would be the perfect time to splurge and give in to all the requests of our children. Of course, there are ground rules that we set (and add to) every year, but they love to see the possibilities that come from the power of Yes.

Willing to give it a go? Consider reading the picture book Yes Day and begin brainstorming what would be in your Yes Day.


5 Reasons to Try a Yes Day with Your Children

1. Do you remember the feeling of childhood and lack of opportunity to make your own decisions? Much of the day is dictated to you. Getting up at a certain time, running errands, chores, homework, bath schedules. Yes Day gives your children the chance to see what it's like to make the decisions. And, if they're anything like our kids, they learn that eating donuts, candy, and cookies at all three meals really does make you feel miserable. The natural consequences that come from Yes Day ideas are fabulous teachers themselves.

2. Set the limits and make great choices. Our ground rules are that no one can choose anything that would be harmful to themselves or others. And school is non-negotiable. We have gone out for bowling and movies, watched a lot of TV, and eaten some really strange combinations. And also said off limits to jumping off of the top bunk. Some things deserve the grand "No."

3. Let your kids see you relax and take part. Perhaps your children have this scenario worked out in their heads that Mom and Dad would freak if we... or I can't even imagine Mom and Dad letting us... This is likely my favorite part of Yes Day, seeing the surprises on their faces. Guess what? Mom doesn't like to get out of her pajamas either. And Dad could be convinced to relish a doughnut dinner. Just sayin'.

4. It makes for great sibling fun. With our three children, about two years apart in age, they have had a great time in the weeks and days before Yes Day, scheming what would be the best question to ask. It gets the 10-year old asking the 5-year old (and really listening to him) what he wants to do. Because, guess what? 5-year olds are really in touch with their silly side in ways that even 10-year olds have forgotten how to do!

5. Sometimes you see just how reasonable your children really are. No, Yes Days are not full of awesome for the parents. Kids get out of control. Tantrums happen. But they happen on all the other days, too, so why not have one really memorable day in the mix? Every year I brace myself for the dramatic requests that our three will pose. But, I've found, year after year, that our children know our means (and what cool things we're saving for), they have a decent sense of what could be harmful, and their dreams are delightfully (at this age at least) simple. Perhaps I should be this tuned in more often. Maybe I could actually say yes to things that are beyond my patience level at the time in order to see the Yes joy that they receive from the experience.

This year, Yes Day includes donuts for breakfast, staying in together the whole night, and lobster/crab eating while watching TV. And that's not even my Yes Day (though it's pretty darn close if I had to choose myself).

Would you do it? Have you celebrated a Yes Day?

xoxo, MJ

Printable Eraser Valentines

This week we're sharing all the easy. Yesterday's bubble messages were round one. Enter the eraser ring as round two! We gave these to C's Brownie troop, and they were a huge hit.

These printable tags make ring candy or ring erasers the coolest valentine! Because easy valentines are the best kind.

These printable tags make ring candy or ring erasers the coolest valentine! Because easy valentines are the best kind.

This is completely not a sponsored post, but, let's be real here, Target has the best finds. For $3 we found this 24-pack of glamorous and geometric rings. They are jumbo-sized, you know, just in case you have a bunch of grown-ups who might delight in a fancy eraser ring. Ahem.

We wanted to make something super tiny, similar to a price tag to add onto the rings. The smallest Valentine you might send is right here for you in our printable. And you know I can't resist the pun whenever possible. And so we present,

No doubt about it Valentine, you're a gem.

Grab a hole punch, some ribbon, twine, or yarn. We've grouped a lot of tags on one page to save you paper, too! Valentine's Day was never so girly and easy peasy.

These printable tags make ring candy or ring erasers the coolest valentine! Because easy valentines are the best kind.

These printable tags make ring candy or ring erasers the coolest valentine! Because easy valentines are the best kind.

Keep the love going! And have a fabulous Valentine's Day.

xoxo, MJ

Bubble Valentine Printable

Maybe I saw you at the store this weekend. What that you in Target, too? The mad dash for Valentines, after receiving the note from teachers on details for this week's celebrations, was a real deal for many parents. We spent a few more minutes than most, circling the aisles, trying to find something perfect for boys and girls, with a definite fun factor.

Easy and cute way to personalize bubbles for classroom Valentines! Print now and assemble in five minutes.

Easy and cute way to personalize bubbles for classroom Valentines! Print now and assemble in five minutes.

We settled upon these cute bubble blowers in assorted colors! My daughter and I both loved the design and colors, but we needed to create a personal element.

Easy and cute way to personalize bubbles for classroom Valentines! Print now and assemble in five minutes.

Easy and cute way to personalize bubbles for classroom Valentines! Print now and assemble in five minutes.

She and I made this printable together. She's a big fan of the smiling hearts, drawn in all the colors of the bubble wands, and I like that the card expresses friendship and good wishes without going over the top into mushy, gushy love messages for 7- and 8-year olds.

Easy and cute way to personalize bubbles for classroom Valentines! Print now and assemble in five minutes.

Easy and cute way to personalize bubbles for classroom Valentines! Print now and assemble in five minutes.

With a bit of Valentine washi tape, we attached the strip of paper to the bubble vile. From there, we wrapped the message around until we came to end of the message. She secured the rolled message with a Valentine heart sticker for an extra sweet ending.

Easy and cute way to personalize bubbles for classroom Valentines! Print now and assemble in five minutes.

Easy and cute way to personalize bubbles for classroom Valentines! Print now and assemble in five minutes.

Click here to print a full page of Valentines! Enjoy a little more happy togetherness tonight, now that your stack of Valentines are ready to go!

Happy crafting!

xoxo, MJ

Modern Parenting Challenge: What Type of Parent are You?
Modern parenting poses a new set of challenges. Labels are limiting but can also offer insight into your preferences. What type of parent are you?

Modern parenting poses a new set of challenges. Labels are limiting but can also offer insight into your preferences. What type of parent are you?

Before I became a parent, not yet pregnant with my oldest daughter, my husband and I would dream of what type of parents we wanted to be. These were long conversations (like you have before children) over coffee or wine, with lofty plans tossed onto pages of a pretty journal, writing it all in one place to show our dedication and commitment to this new thing called parenthood.

Spin us ten years forward and here we are. Gold-leafed journal pages of lofty ideals are not a daily reality. The core beliefs contained in those writings remain the deep undergirding of big parenting decisions and family goals. But, the weekly grind of homework and bath/shower schedules, mood swings, and tantrums can soften those strong footings... leaving me sometimes feeling a bit off course.

In lunch conversations and cocktail parties, I hear all the labels and buzz words like Tiger moms or Helicopter parents or the newer throwback, free-range parenting style. It all feels like a bad pop quiz from a teen magazine. I often find labels exclusionary and typically unhelpful. Simple classifications put neat bows on situations and people which are far more complicated and dynamic.

But maybe, by spending a post (or five minutes in your case) thinking about what we do not want to be as parents, we might be able to go more boldly, more intentionally, in the right direction?

Try this.

Do you know in your gut that your child is strong but needs pushed to fulfill his/her full potential? Are you strict to keep him/her on schedules for school and sports and extra curriculars, making sure that he/she accomplished all that they can?

You have a hint of a Tiger Mom to your style.

Do you find yourself concerned about your child's well being? And because of this worry, insert yourself into situations at school or with friends to make sure your child is safe or seen in the best light?

You're breaking into Helicopter parenting.

Do you think that kids should be kids and be able to explore the world? Do you reference your own childhood stories of independent trips to the store or late nights with friends as the way you want to your young children to experience life?

Label yourself a free-range.

Of course, there are limitless possibilities for other "types" and characteristics that we as parents float in and out of as our children age and we learn and grow.

I've been thinking a lot about the people our three children are becoming and what influence I have in that process. I'd like to think of myself as a caring and attentive parent, ready to make the world magical and beautiful, especially when it seems anything but that to my children.

But, as we enter adolescence with our oldest, and peers and other influences play a larger role, I realize more and more that I cannot prescribe or create the world for my children (I know, silly that I thought I could). My job is to show them their own unstoppable courage and beauty, get them to trust in it repeatedly, and make the little choices that lead to larger choices that will fit in line with the incredible people God created them to be.

I also need to keep them hydrated and hold them accountable and a few other tasks along the way.

From fairy tale dreams to Cosmo labels, I'm not sure what my style is, but I do know that it deserves further reflection and continued development. And I will give it so because I get to be the mother of three amazing people, and they deserve nothing less.

Are you a parent? If so, how would you describe your parenting style? Could you categorize the style of your parents?

xoxo, MJ

PS. While you think, let me toss you one of my favorite reflections from Thomas Merton that speaks to me on parenting:

“For me to be a saint means to be myself. Therefore the problem of sanctity and salvation is in fact the problem of finding out who I am and of discovering my true self.”


Snow Day Essentials with Kids

When the Weather Channel starts the warnings and extended coverage of the next big snowstorm heading our way, I avoid the grocery store. Meh, we might not have enough milk or eggs to get us through. BUT, what we will have is entertainment.

With three children under the age of 10, I try to keep our creativity cabinet(s), closets, and shelves - yes, we have a lot crafting supplies - ready to go.

Don't be caught unprepared on a snow day! Here are 8 items to keep stocked so that the small set is entertained all day long.

Don't be caught unprepared on a snow day! Here are 8 items to keep stocked so that the small set is entertained all day long.

While I have nothing against TV or movie watching, snow days, at least in Indiana, are rare enough that they need to be savored and treated with extra special care.

Do you remember your childhood snow days? Whether they were spent outside in the white, fluffy hills or pretending indoors, there's something magical to the one-of-a-kind snow day. {Side note: I do not mean to discriminate and say that only snow days are special. When living and teaching in South Carolina, we experienced hurricane days, and those were memorable - in a different way!}.

For a spattering of independent time and a mix of togetherness, here's what we have:

Snow day fun encapsulated in crafts, imaginary play, and some good old-fashioned games! Make it special for everyone AND keep your sanity.

Snow day fun encapsulated in crafts, imaginary play, and some good old-fashioned games! Make it special for everyone AND keep your sanity.

Imaginary play

Snow days are amazing for the surprise as well as the great expanse of free time! Take advantage of the time to go big on pretend play. Build the forts and pull out all the train tracks. Your children will be entertained in their own creations for hours with no worry of needing to clean up any time soon. Also, adults, go ahead and jump in the fun and pretend you're the Big Bad Wolf or Nemo in the ocean. Your children will forever remember your smiles, laughter, and silly accents.

EASY GAMES

Sometimes adults have to get some things done during snow days, too! Have simple games at hand. We love ones like UNO and Spot It that work well for all three kids and cause few sibling arguments (bonus all around). Also, two-person games are right up our alley right now so that two people can be engaged and not "need" the third to enjoy the game.

SENSORY FUN

As my children grow, I see them gravitating to projects and final creations. Time that they once spent endlessly in process with playdough or sand, they now focus on getting something accomplished. This is natural to maturation I suppose, but snow days are the right time to abandon the usuals and bust out a homemade playdough recipe or warm up the modeling clay. I find it completely relaxing, too, spending time feeling the textures and making/remaking creations with no real end goal.

CRAFTING

During long expanses of time together, we burn through a lot of projects so keeping the supplies stocked is not always so easy. We always have a mound of construction paper and white paper as well as scissors with different blades and different sizes for every little hand. Perler beads and other small craft projects are right in our family room, easily accessible for anytime crafting. Also, we have a stash of cardboard tubes from paper towel and packaging supplies on hand just in case someone might need to create a magic wand, a scary scepter, or an impromptu bowling game.

MAKE a special treat

The Snoopy Snowcone Maker? The Easy Bake Oven? Snow days afford the perfect opportunity to break them out . . . or the beloved cookie recipe. The divine smell of brownies baking as everyone takes some individual time to read makes the whole house cozy.

What are the essentials for a great snow day at your house? I'm always looking for a new trick to stuff up my sleeve.

xoxo, MJ

Create Your Own Christmas Tree with Painted Glass Balls
PC_glassornaments.jpg

It is the season. Frenzy has set in around here. Not full-on panic, but excitement, merriment, forgetfulness, and binge eating at weird hours of the day. Deep breaths. I am excited to say that we have whipped up a handmade tree that I am all sorts of in love with.

It's like Pars Caeli reincarnated in tree form. My oldest daughter and I went shopping for the supplies together and selected the palette which ended up looking a whole lot like this one here. It's the first time I've gone non-traditional, and the colors pop with the festivity of the season.

If you're looking to create a themed tree or something unique, try this easy method that is friendly to ages 3-133 as long as everyone is careful with the glass ornaments!

PC_glassornaments_1.jpg
PC_glassornaments_2.jpg
PC_glassornaments_3.jpg
PC_glassornaments_4.jpg
PC_glassornaments_5.jpg

These are magical in their final form, even better than I had hoped. And I can't wait to show them all to you on the tree, but, first, I have a few more additions to show you to our that include a few super easy projects!

Check in tomorrow to see the best ever pink and orange ornaments for our fanciful tree.

Also, starting later this week, a return of one of my favorite times of year! The 12 Bloggers of Christmas will be sharing with you their favorite holiday traditions and projects/recipes that have kept them excited about the holidays in the midst of frenzy! I'm delighted to have their personalities here to share with you.

xoxo, MJ

Thanksgiving ideas: Kids' Table Projects
PC_Thanksgiving_kidstable.jpg

Thanksgiving awaits us in just 9 days. Our family is hosting as we typically do, and it's my absolute favorite time of year! Our festivities this year include, along with both sets of grandparents and my aunt, my nephew in college who is near. He'll bring along friends, too, who may not be able to travel home, and I'm excited to open our home to a new set of companions.

We may have to break out into two tables for the first time. My children might experience the kids' table for the first time ever. Did you enjoy any holiday meals from the kids' table? My maternal grandmother often hosted our Thanksgiving, and I have memories of many years (as the youngest grandchild) spent at the table that was adjacent to the main action - the kids' table. To be fair, the kids' table had a lot of antics to be enjoyed so it wasn't a disappointment to be sitting there.

What if it were a treat? Or if you're looking for ways to keep your children busy while the meal is prepared or football games are watched? I've discovered these five great projects from creators who know what they're doing that I wanted to share with you. Such great results!

FAN TURKEYS

Hand turkeys have had their time. Let's try fan turkeys! For this you'll need some construction paper, markers, and glue. I love that it's more detail-oriented but can amuse the young child, tween, and maybe even teen. Googly eyes are always a nice addition. Check out all of the instructions over on A Girl and a Gluegun.

THANKFUL HEARTS

I love this gesture of gratitude that Katie and her family did over on Lasso the Moon. On Thanksgiving day, they gave family and guests small plush hearts and thanked them (one on one) for little and big things they do for them. On one sheet they wrote down who received each heart and why.

Throughout Thanksgiving Day, our family will take on the task of giving away as many hearts as possible. To give them away, we need to notice something that a person does for us, without being asked, that shows they care about us. (This can include neighbors and others, but I think we’ll just be sticking with the members of our family this year.) We give them one of our hearts, thanking them for the thing they’ve done for us, recognizing the reason why they’ve done it.

And there you have a lesson in gratitude for all to enjoy.

FIRST THANKSGIVING NAPKIN RINGS

This one will delight even the youngest set. While the turkey is roasting, pull out those collected toilet paper tubes to convert them into one of a kind napkin rings. If you head over to Crafts by Amanda - warning she has a ton of amazing projects for kids and adults - you get all the details on how to make your pilgrims just right.

THANKSGIVING TREAT BOXES

And if napkin rings weren't sweet enough, how about these adorabel treat boxes? They'd be fun to craft in advance and use as placecards, or to leave ready to decorate for your young guests. Wouldn't these be a fabulous take home treat, along with tons of extra turkey, for kids traveling near and far? Learn all the details over at A Pumpkin and A Princess.

OMBRE PINECONES

This is the perfect project for the teens and tweens who may not be delighted that they are relagated to the kids' area. Raid your backyard or any craft store this time of year. Grab some paint brushes and set one example on the table to follow. The ombre effect is really pretty and metallic edging would be great, too. With a bit of sparkle, the kids can feel like the are getting ahead on their Christmas decorating. Oh, wait, kids probably aren't worried about that. :)

Wishing you and your kids a fabulous Thanksgiving. How do you keep your kids happy and entertained while hosting?

xoxo, MJ

P.S. Need some more ideas to make this Thanksgiving the best? Check here.

A free printable joke calendar

We took a quick trip to Michael's today, and we were greeted by the countdown sign: 43 Days until Christmas. I always have mixed feelings about getting into the Christmas spirit too early, but I do admit that the decorating, the shopping and making, and the glimmer in my children's eyes... well.

So we turned our anticipation into a fun project. You know I love a good corny joke, and we made up a whole batch to put into an Advent calendar.

I'm delighted to partner with Steph from Modern Parents Messy Kids to offer a great free printable countdown with jokes for every day! Yes, holiday-themed sillies to uncover for a quick laugh, for school lunches, for bedtime giggles.

I might be a little excited about it!!

We made ours into the shape of a tree to serve a dual purpose of holiday decor and joke teller. The printable comes in two parts: pages of colorful, numbered ornaments paired with 24 jokes to attach to the back of each. Run on over to MPMK to download, pin, and share yours!

Are you ready to break out the holiday spirits?

xoxo, MJ


Giveaway with DLK

Helllooo, friends! I missed you. I missed you so much that I really feel like I have to make up for our time apart. How about a little present to make it up to you? No, no. How about a big present?

I'm teaming up with some best buds (Joy of Frock Files, Melissa of Lulu the Baker, Lindsey of Cafe Johnsonia, and Kim of Design Life Kids) to give away a $150 gift card to Design Life Kids! Yes, mm hmm. Happy about it, too. Design Life Kids is a new online shop for all things modern, designed, and fun. Kim has packed her store with home accessories, kids couture, and fantastical gifts that you'd feel good wrapping for anyone on your Christmas list.

What would I buy? I've narrowed it down to my top six gift picks. What would be yours?

  1. Je T'Aime Triangle Tee
  2. Playful DIY Craft Book by Merrilee Liddiard (one of my favorites - see my fangirl post)
  3. Arne Jacobson Cups
  4. Pasta Amore Pillowcase
  5. Dot Wall Decals
  6. Allo! Lemon Tee


Our giveaway runs until Friday morning at 12:00am (midnight Thursday). I really want you to win. Here's what you gotta do:

* Leave a comment below with your favorite item from the shop.
* And for bonus entries....Like DLK on Instagram
* Regram one of our Instagram images.

xoxo, MJ


a Rafflecopter giveaway

Halloween Games and Crafts
PC_Halloweenparty.jpg

'Tis the season for ghoulish delights and ghastly scares. But sometimes children (and adults) enjoy the light-hearted festivties rather than the fear-inducing elements of Halloween. We celebrated my 5-year old son's birthday, and I put together a few hours of crafts and games that are easy and sure to delight! The beauty of all of these is that they are simple, use mostly what you have around the house, and your kids can even help to create them.

PC_halloweenparty_0.jpg

A twist on a classic - Halloween Bingo! Try using candy corn to mark off the Halloween objects and characters. Even the children that don't shout Bingo when with their extra treats on the board! My favorite Halloween printable board is from The Artsy Fartsy Mama. It has beautiful illustrations, and it's easy enough for our 5 and under crowd to understand!

How about a retake on the classic ring toss? Sometimes Creative had the best idea to use witch's hats! Since this was an afternoon celebration, the room was dark enough to show off our glowstick rings that made the tossing even more fun (and not dangerous for any by-standers). This would be really fun using glow in the dark (sorry, we are all about it these days) paint or tape on the hats, too, and playing it as a night-time game with the older set!

The easiest jack o'lantern treat bags can be made with an orange sack, a hole punch, some black paper, and a green pipe cleaner for the curly stem. We stuffed ours with candy, Halloween stickers, and a special ghostly flashlight! I used the same face shapes for all of the bags so it was a quick assembly line of glue to get them all in order.

PC_halloweenparty_2.jpg

An easy craft for little hands to master? Bat sitters. These are construction paper, paint, pipe cleaners, and a tp tube. Buggy and Buddy made these adorable hanging bats, and we used the same process! To make the creation go easier for the children, I painted the tubes beforehand. I also glued on the eyes and cut out the wings. So, it was their job to attach the wings, and thread through the bat legs for a final winged character.

Talk about using items found around your house... how about a little pumpkin and ghost bowling with toilet paper? I saw these all over Pinterest and had to give it a try. Helpful hint here: have a real pumpkin with some weight to it to toss at the ghosts because that solid three-wide stack of toilet paper is a pretty solid force to knock down. We changed the game to a throw rather than a bowl so we could watch the the tower come down.

PC_halloweenparty_4.jpg

Hanging ghosts and jack o'lantern clementines and cuties are fun to have around (party or not). I've found myself drawing on our oranges even days after the party as a fun way to add the joy of the Halloween to the kids' lunches. In fact, I even got this from my 5-year old:

"Mommy, are you really going to draw on everything?"

"Yes. Yes, I am."

PC_halloweenparty_5.jpg

And why should the fun stop when the party ends? We needed some fun thank you cards after the celebration, and I thought these black cats from Parents Magazine were so clever. We made one the way the free printable (!) shows you and the other, we turned its head so that it could easily fit into an envelope. These are so fun to sit around on tables and shelves. If you run out of googly eyes (like we did) use foam stickers to make your cat have glowing eyes!

PC_halloweenparty_6.jpg

We loved having our friends over to create and play! It's a wonderful way to celebrate Halloween. You can put all this together for a playdate this weekend!

Our costumes are ready. We have a ninja turtle, a Harry Potter character, Dorothy, the Scarecrow, and lucky me is Glenda the good witch this year. How will you be celebrating Halloween this year?

xoxo, MJ

Halloween Hanging Ghosts
PC_hangingghosts.jpg

Ready for a really easy Halloween decor with high impact? Let's make some Halloween Hanging Ghosts. These are an awesome addition to your party and interior decorations for the season.

Inspired by these twirling spiral ghosts, I created these ghoulish creatures that are now hanging from chandeliers and pendants all over our house.

I love how simple they are to create from cardstock, scrapbook paper, or posterboard. You need something that will give you extra weight so that gravity can do its thing.

PC_hangingghosts_1.jpg

You can cut the design with scissors or upload this ghost file on to your Cricut Explore. I mass produced these ghosts so that we could have some hanging from the chandelier in the dining room and the kitchen pendants. These were created from 12" x 12" white scrapbook paper.

This swirl can be transformed into candy corn stripes or the twirly stem of a pumpkin, too! The best part about hanging ghosts is that they catch the wind easily and spin in the air. I attached ours to the ceiling lights with invisible beading string for a fun "magic" appearance.

Have you decked out your home for Halloween yet?

XOXO, MJ

The Great Pumpkin Round-Up and a Glow-in-the-Dark Pumpkin

Pumpkin decoration has become a hobby unto itself. Between painting and carving and dyeing and covering, the pumpkin shape is quite the autumnal muse.

This year we purchased our pumpkins early, and before we carve them, we're having some glow-in-the-dark fun with sllly expressions. These faces have the jack-o-lantern charm. I love how they add the festive fun of Halloween during the daylight and some of the freaky during the dark.

I'm over at Classic Play showing you how to make these glowing faces as well as giving you only the best of the best for The Great Pumpking Round-Up.

How are you decorating your pumpkin this year?

XOXO, MJ

Simple lessons: Jack O'Lantern feelings

Happy Friday, friends! Every now and again I'll be featuring a new series on Pars Caeli called Simple Lessons. These are not projects as much as they are easy ways to connect and to teach your children. Many of them might not be Pinterest beautiful, but they are quick, approachable ways that you can use what's going on around you or in your home to enhance your role as a parent.

We were eating dinner the other night, my husband was away for work, and the topic of war came up. As a family, we haven't really delved into war, figuring that our children (9,7,4) aren't quite ready for that kind of catastrophic topic. They, especially the 4- and 7-year old, had clear and tough questions.

  • "Why would anyone go to war?"
  • "How do you know who wins a war?"
  • "Do we know anyone who has fought in a war?"

We talked about these issues for about 10 minutes when one of them asked if we knew anyone who had been killed in a war. And then they all got a little anxious. Death, killing, violence are not our usual conversation topics. They all became a little unsure that we should be saying these things out loud.

I assured them that we should never be afraid to talk about any of this...even the things that upset us, worry us, and scare us.

And it made me think, that especially with my youngest, I should spend some more time talking about emotions and HOW TO talk about emotions. He had recently drawn a sad face in one of his pictures and felt the need to draw over it with a happy face... he didn't like seeing the sadness.

Enter Halloween and all the ghosts and ghouls and jack o'lanterns. Halloween can serve as a great entrance into tough topics of death and the afterlife. I decided that pumpkin art might be an easy way to open the topic.

I gave him a stack of small pumpkins and asked that he draw all sorts of emotions on their faces.

  • What does happy look like?
  • How about sad?
  • Can you draw surprised?
  • And frustrated?
  • How about angry?

He made patterns with the various faces and enjoyed lacing them together with twine, and I was able to sneak in some good conversation about his feelings. I wanted to help him understand that it's good to feel all of these. Sadness is good. Anger is good. Happiness is good.

It's all a part of being human. We want to express our emotions.

How we express our emotions is really important. We never want to harm anyone with our words or our bodies - that's where the trouble comes in. But it's right to feel sad when something bad happens to us. And it's good to get angry when someone has upset you. Feelings of all varieties have meaning.

And I wanted him to know that no matter how I might express my feelings, I always love him. Even if my face might show something different, my love is stronger than a feeling. He seemed to get it, likely telling me he didn't need this lesson in the first place...

but maybe I did.

Consider taking advantage of the fearful and haunted of Halloween to talk to your kids about how they're feeling.

Have a bright weekend!

xoxo, MJ

Texting and Children: What to do

I was away on Tuesday, sorry to miss you all! I was away from my husband and children for the night. My kids had the day off from school, and my husband took the day off to hang with them. They enjoyed bookstores and the movies, and I was missing out.

During my morning activity, I received a series of texts back and forth from both of my daughters. They went something like what you see to the right.

Love notes. Check ins. Even silly jokes.

Their messages totally made my day, and I thought about how glad I am that my seven- and nine-year old children have Ipods and text me.

And then I hesitated. Wait, what? I'm glad that my kids are texting?

Insert moral mom dilemma.

Oh, geez, is this good for them? What does this mean for their budding communication skills? Are they focused on what's going on around them or are they zoned into a device?

I try to limit my kid's screen time, generally. No one can take their device to school, and the kids ask us before they take them anywhere outside the house.

If I'm being honest about it, I love getting their texts. It's another tool in the belt for seeing inside their minds, another avenue to talk about what's on their minds. As long as it doesn't dominate or even become a majority of communication, let's meet each other there, too. How can we as parents use this form of communication to help foster positive relationships and parenting with our digital kids? 

Research and data isn't everything, but I'm prone to lean my ear toward it. Here are some interesting aspects to digital communication with our kids, tweens, and teens. 

Industry research shows that 61 percent of those on the internet are 3-11-years old, and a full 22 percent of children 6-9-years old have their own cell phone (whoa).

Between the ages of 8 and 13, kids are developing key relationship and communication skills, and typically want to spend as much time as they can with peers. Technology just gives them new ways to do that. Texting, in particular, seems tailor-made for the tween psyche. Not only does it allow users to perma-connect with their social group, it also gives them all sorts of new ways to either include others (by sharing peeks at the screen or using slang) or exclude them (by typing silently while next to Mom on the couch).

Parenting.com

Danah Boyd, Microsoft researcher and fellow of Harvard University’s Berkman Center for Internet & Society, notes that there are a number of reasons why kids aren't connecting with one another the way we used to (with lack of neighborhoods, busy after school schedules, worn out children).

The difference is that when we were kids, we got on our bikes and checked in every once in awhile at home but weren’t expected to be connected to parents all the time. Young people just want to be with friends, and that is no different from any generation. But they have fewer opportunities to connect with friends.

I see that already with my kiddos. And I support strong friendships, not at the cost of family time or other communication, but I support them. Texting can only be an additional, and not the main, source of communication.

While the Pew parents were happy to be able to reach each other and their kids while apart, they were less likely to eat dinner as a family than were other households, and tended to report feeling dissatisfied with family and leisure time. A study by computer software maker Norton made a similar finding: When total time spent online increased beyond a certain point, both kids and parents reported feeling less connected.

Parenting.com

So here are our general rules:

How do you do it? What are your guidelines? Do you text your kids?

xoxo, MJ

P.S. Love these creative ways for teachers to incorporate texting into a lesson.


We're Going on a Leaf Hunt Wreath with Classic Play
PC_fallwreath_1.jpg

Celebrating fall for all the right reasons - the smells and the flavors, the sounds and the feel. I created this easy Leaf Hunt Wreath with my youngest last week, and I'm delighted to be over at Classic Play sharing a group of mini projects that ended in this.

We're still working out the kinks in the back-to-school schedule, trying to fit in all that we'd like to do without becoming totally exhausted. Sometimes a group of smaller projects works best for us... like this one. Over a series of days, we went on a hunt for fresh fallen leaves, we sorted and pressed them, we admired and painted them, and then we created the indoor fall wreath to show off all of our work and time together.

PC_leafwreath.jpg

The final creation is a colorful addition to your home's fall decor, and your little ones can feel good about their time spent, over many days, hanging out with you!

Happy fall!

xoxo, MJ

If you're looking for more great ideas, check out this easy pumpkin decoration and follow our board for all your fall and Halloween brainstorms!