Posts tagged tie dye
Endless Summer Projects: Rings of Color Sharpie Dyed Shirts
PC_Endless_summer.jpg

It's my turn! (I am so bad at delayed gratification.)

Time to welcome you all to another wonderful Endless Summer Project from the team of hyper-cool moms: Melissa, Alexandra, Jen, and me If you stepped into the vast wormhole of the internet last week and missed Alexandra's hopping backyard BBQ, you missed a safe alternative to horseshoes, a great grilling recipe, and an adult beverage to adore. Skip on over and enjoy... and then come right back. Or maybe go check out Melissa's cute mosaic stepping stones first. And THEN return, bright-eyed and bushy-talled to check out our Rings of Color Sharpie Dyed Shirts!!

PC_endlesssummer_sharpieshirts.jpg

Last summer we did a great tie dye shirt project together, and my children loved crafting and wearing their shirts. To kick off our summer together, I wanted to make another wearable piece, and what could be better than an excuse to use Sharpie markers?

This project is totally inspired by the great Martha Stewart (I'm hoping we'll be BFFs after next week). To see a helpful video on how to, go here.

Here's what you need:

  • Light-colored shirts
  • Sharpie markers - be sure to avoid contrasting colors unless you want brown hues
  • Isopropyl alcohol
  • Eye dropper
  • Circular surface
  • Rubber bands
  • Cookie sheets

We took our project to the backyard for more summertime fun, but this craft is safe enough to do in a clear spot inside for a foolproof rainy day creation, too!

PC_endlesssummer_sharpiedyedshirts.jpg

Neon is all over the place this summer so we chose new NEON Sharpies. Their saturation was a great choice for the brilliance in color palette.

Step One: Insert a clean cookie sheet into the t-shirt. This will prevent the alcohol and markers from bleeding through to the back of the shirt.

PC_endlesssummer_sharpiedyedshirts_1.jpg

Step Two: Visualize your design (or not). My girls and I decided we wanted to created a strip of colors that ran down just one side of the shirt so we planned out where we wanted the circular shapes to go. If you're more into free form, you can set up one circle at a time and add as your fancy desires.

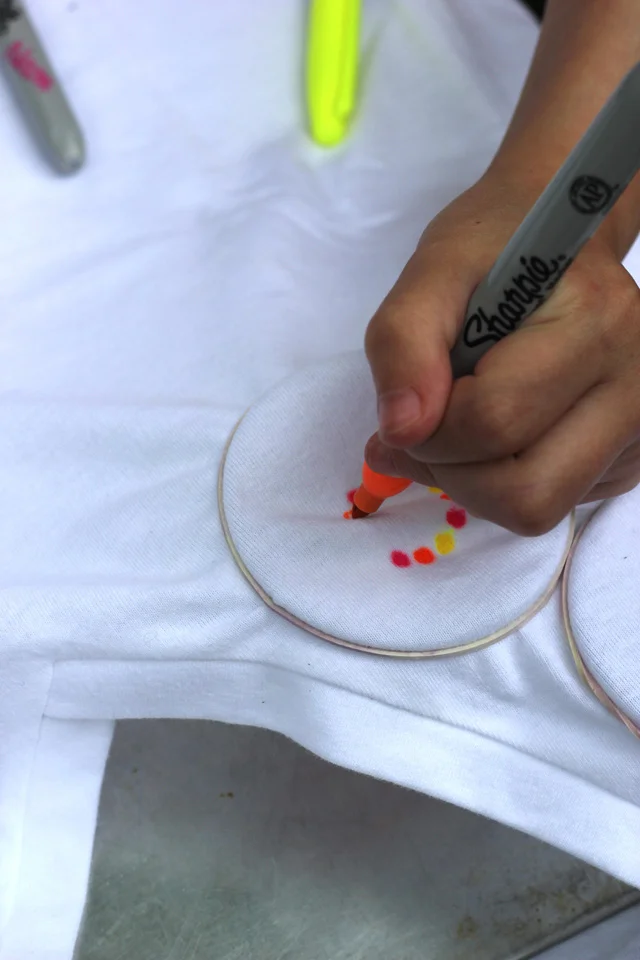
Step Three: Insert the circle object underneath the top layer of the shirt. Secure its placement with a rubber band.

PC_endlesssummer_sharpiedyedshirts_2.jpg

Step Four: Draw thicker dots with Sharpies in a ring pattern.

PC_endlesssummer_sharpiedyedshirts_3.jpg

Step Five: The fun!! Fill an eye dropper with isopropyl alcohol. Squeeze out one drop at a time and watch the colors slowly bleed. Try different effect for dropping it inside the circle where no color is and dropping it right onto the dots themselves. To keep your colors more brilliant, limit your drops of alcohol. To spread your circles the most, keep adding drops.

PC_endlesssummer_sharpiedyedshirts_4.jpg
PC_endlesssummer_sharpiedyedshirts_5.jpg

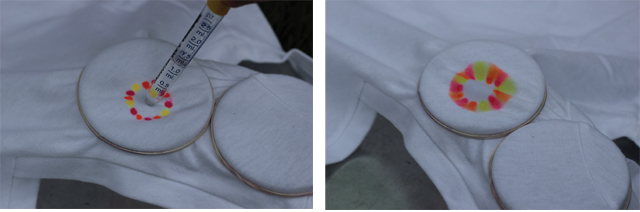
Step Six: If you don't want the rings to bleed into one another, be sure to wait until the alcohol has mostly dried before moving on OR spread out the rings so that they do not overlap.

PC_endlesssummer_sharpiedyedshirts_7.jpg

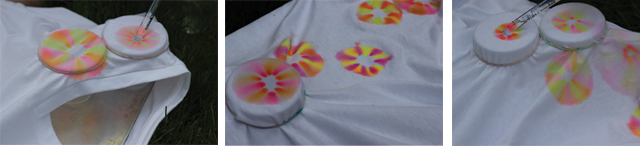
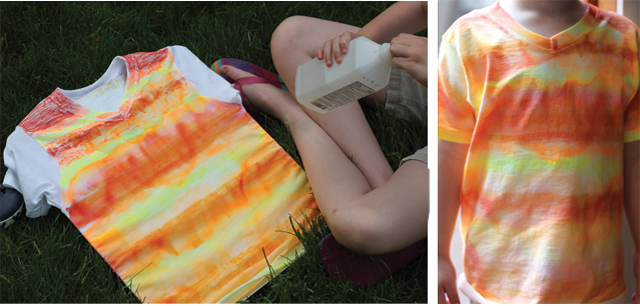
Step Seven: Allow the alcohol to dry (mostly) and flip to the other side to create more patterns and fun! Once the alcohol has dried completely on both sides, remove from cookie sheet. Pop in the dryer for 5-10 minutes (on its own) to set colors.

Step Eight: Wear to your heart's desire! Colors should now be set within the fibers but I'd still recommend washing with like tones on the first machine wash.

PC_endlesssummer_sharpiedyedshirts_6.jpg

Fair warning here, friends: fun projects like this might ensue a whole lot of sillyness and laughter so be prepared to make great summer memories.

PC_endlesssummer_sharpieshirts.jpg

Sidenote: Sharpies bleed in the most wonderful ways so for my 3-year old son, we made a striped shirt. Try your hand at all sorts of patterns and shapes! L wore this for three days straight until I had to cut him off. :)

PC_endlesssummer_sharpiedyedshirts_9.jpg

So grab your Sharpies, friends, and get creating!! We'd love to see your creations - share them with us using the hashtag #endlesssummerprojects and look for sneak peeks of Jen's fabulous project for next week!

Here's to an endless summer of childhood fun.

xoxo, MJ

Mommy & Daddy School

Hi friends! This is totally what I'm feeling right now (so I had to make a pinnable. That's normal, right?). I have this image of my daughter going over to our outdoor faucet and leaning down to take a drink to discover that the water is bursting out of the pipes full blast as she goes to take a drink.

And it's all good.

I have always loved the feeling of going to bed exhausted (let's pretend this is a feeling in past tense) from a well-lived, emotional, love-ful day. We're having a lot of those, and I feel blessed.

However, the organized list of activities for Mommy & Daddy School is not quite what I had expected. As you remember from last week, we base our summer learning together on what makes our children curious. For blogging purposes, I'd like this all to be content-rich, developmentally-appropriate, superior learning.

But, this is real life, and I'm the momma here, and that title trumps blogger in any old Scrabble match (even if it has fewer letters). So, here's what we've had cooking for Mommy & Daddy school. We'll work in our bonus point fun (more on that later) and responsibility songs (ditto on more later) as the weeks go on, with the hopes that these might be useful to you.

Three themes have emerged thus far from our learning: tie dye is unbelievably amazing, scavenger hunts make any kind of learning more fun, and this country we live in is pretty stupendous. (Can I tell you more about the second two in a bit?).

Okay, so let me lay out these fun times so that you can pin, bookmark, star this and do it with your kiddos (or friends).

Tie dying is easy, messy, and perfection for summer. You need:

White (I recommend) cotton apparel - 60% cotton or more
Dye - we used a packaged kit from Tulip that was great and ready to go with squirt bottles half-filled with dye (retail $15)
Rubber bands and gloves (already in our kit)
Wide open space and a willingness to get dye on any of your clothes

We wanted a spiral design in the middle so I grabbed the center point of the shirt and twisted. As the twist got bigger, I placed the ends of the shirt around in a wrapped fashion, and I rubber-banded the shirt, creating four sections. This made it super easy for each child to know where to put their colors.
Some wanted two colors, some wanted all colors, and sectioning it off like this helped them to understand color blocking and bleeding a bit better. We found that putting on way more dye than you think you need is best. Soak it in color!
Once saturated, I wrapped them in plastic wrap to intensify the color. We kept them out in the sun all for about six hours, and I then washed out the dye in cool water. Check out the rainbow sink!
After the water runs clear, which was about 4 minutes per shirt for us, wring out the water and pop it into your washer, with a high water, hot water setting. I kept reds separate from blues just to be sure there would be no bleeding.
 We let ours drip dry (be careful they do drip color), and I was so happy with the brilliance of color.
The kids from big to small loved this. My favorite part of the adventure: these rainbow, water raisin piggies.

Take some time to tie dye this summer. It's addictive.

Join me back here tomorrow to learn how we're going to L-O-V-E our job thanks to Gretchen Rubin and The Happiness Project in our Summer of Happiness bookclub.

Thanks for hanging out, friend. I can't wait to show you more of what's going on over here. Have you started your own version of Mommy & Daddy school? Tell us all about it!

XOXO, MJ