With the busy timing of holiday parties and gift giving, you might find yourself in need of something sweet and small to offer to new additions on your list! I find a sense of peace knowing that I have a few extra presents around for the surprises that pop up. Here, to the rescue is a quick jar present that you can make ahead and gift to your heart's content or, if not needed, scavenge for yourself.

First off, if you've never made homemade marshmallows, may I encourage you to grab some unflavored gelatin and get on it! We made our first batch this year, and I am hooked!! Seriously. So much easier than I ever imagined. And waaaaaay tastier.
You can catch our whole marshmallow creation over on the Honest to Nod blog! I'm a monthly contributor to The Land of Nod's fun site, and we shared our experience with fresh marshmallow here.

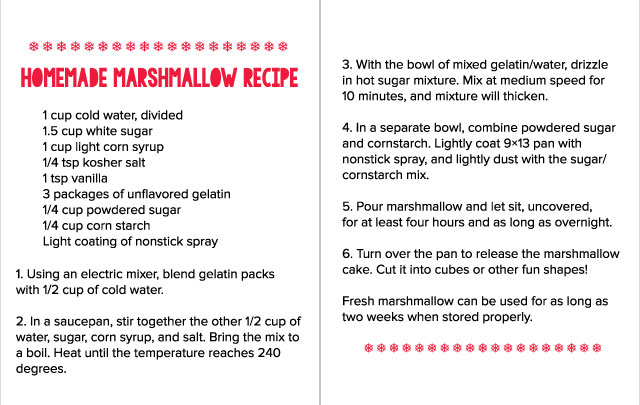
Download the free printable recipe for fresh marshmallow and pair it with a jar of cocoa mix for an almost-homemade gift for anyone on your list!
For these jars, we used small cubes of fresh marshmallow on top of our cocoa mix. You can create your own combination or go semi-homemade like we did (half Kirkland's cocoa mix and half Ovaltine) and gifted our favorite combination of Christmas cocoas. I topped the cocoa with a piece of parchment paper to keep the mix and marshmallows from mixing.

Top off your holiday gifts with these cute stickers from Tiny Prints! Make spirits bright all season long.
All of our Christmas paper goods came from Tiny Prints! Their round stickers look perfect on top of the cocoa/marshmallow jars! These also look great on holiday envelopes and packages. As you can see, I'm all about the hand lettered look this year, and it all came together so beautifully.

My family and I are are nestled home in the balmy 60 degree weather of Northern Indiana! It's pretty unreal, but it's not stopping us from enjoying hot cocoa and marshmallows. And it's certainly not going to keep our Christmas spirits down. We're making the white Christmas this year. Cheers and laughter to you and your family this holiday season! Thanks for reading and supporting Pars Caeli, and all of our new adventures!!