Posts tagged Cricut Design Space Star
Paper Christmas Trees
PC_papertrees_4.jpg

For this month's project, I created these fun message Christmas trees that shout out the joy and revelry of the season! I've been using my drawing tablet a ton (for a new, very special project yet to be revealed), and I want to experiment with creating my own text. So using my tablet, I wrote out the text and made an image of it. I wanted the words to hang on the tree like an ornament or garland might.

Within Illustrator, I created an altered a three-dimensional tree (from the Cricut Design Space offering) to have more of a hook end to each branch. These little trees make great stands for mini garlands, uber tiny ornaments, or in this case, happy phrases that have you hanging on every word. :)

PC_papertrees.jpg

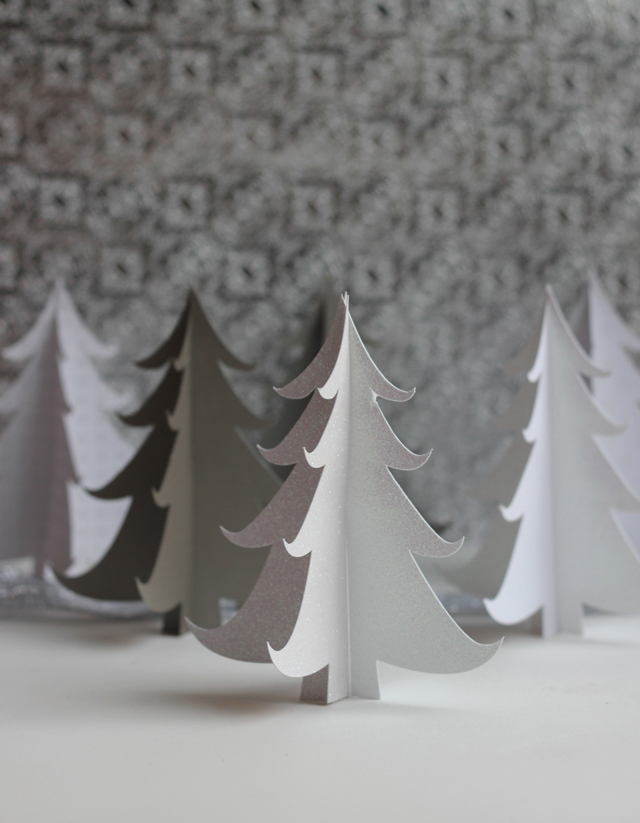
Silver and gold and white fit in every room, every decor. Using metallic and glittery paper in cardstock weight, you have trees that can stand on their own and make super additions to the mantle and the sofa table.

PC_papertrees_3.jpg

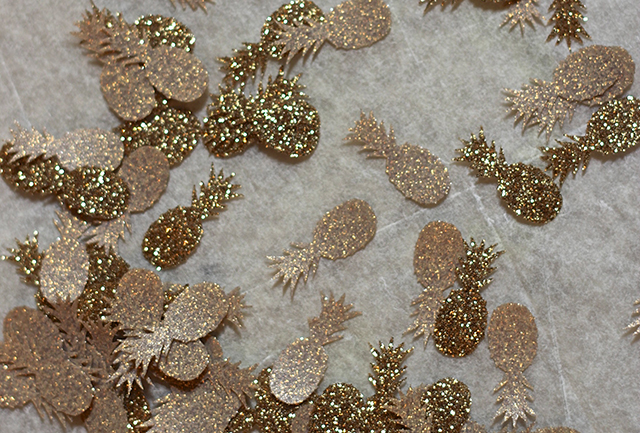
The Merry Christmas sign can be hung on the branches from the curves of the letters. They could also be used as table confetti around the trees or adapted to read "Merry, Merry."

PC_papertrees_2.jpg
PC_papertrees_5.jpg

I am a Cricut affiliate, and I did receive a machine to make these projects. And, it's been fun. Thanks to all who have thrown their support and help along the way. I hope that you'll enter our giveaway and make along with me using the Cricut Explore. If you're a crafter, it's incredibly handy to bring dreams to reality in a really easy, efficient way.

xoxo,

MJ


Snowflake toppers
PC_snowflaketopper_2.jpg

Even though we're in the throws of October and fall, I wanted to show you a super cute gift topper that can transition us right to the winter holidays. As a part of this month's Cricut Design Space Star challenge, along with my Lucky 13 Team Members, I set out to create some Holiday decor and gifts that show off sparkle.

Lucky13_Sparkle.jpg

You need to click around to their posts and see some of the great creations this month, from window clings to pallet creations to Advent calendars and party hats.

1. The Sweet Escape Glitter Cut Out Card

2. Pretty Providence Nativity Board

3. Petit a Petit + Family Winter Wonderland

4. Andrea's Notebook Advent Countdown

5. Simply Sadie Jane Corn Tassel Banner

6. Pars Caeli Snowflake Toppers

7. East Coast Creative Geometric Christmas Ornament

8. Suburban Bitches Let It Snow

9. That Girl Katie Party Hats

10. Sew Creative Let It Snow Recycled Pallet

PC_snowflaketoppers_1.jpg

Since I love the art and process of paper snowflakes (remember these snowflakes that adorned the tree last year?), I wanted to create a project that utilized some of the amazing images that Cricut has in their design space. You don't need to recreate the wheel when there's beauty before you. These ornate snowflakes are even made to be three dimensional.

I used glitter paper, some wood beads that I'd painted gold, pinecones, and twine to blend Holiday Sparkle with the natural beauty of the season.

You only need one 12"x12" paper for a set of six three-dimensional snowflakes. It's amazing the detail that the Cricut can handle. These are really mini works of art when complete.

PC_snowflaketopper_4.jpg

They make a fun banner strung with the wooden beads. And the metallic tones add a fresh touch to the traditional holiday decor.

PC_snowflaketopper_3.jpg
PC_snowflaketoppers_5.jpg

Cricut recently something really fun for the Cricut Explore! You can now Print and Cut. Print any image on your printer and then cut it with your Cricut Explore. Oodles of possibilities!

xoxo, MJ

**I did receive a Cricut machine for free and may receive prizes in exchange for winning projects. I am under consideration for a prize with Cricut Design Space Star. All opinions are my own.

Flower Lights: A Floral Affair
PC_cricut_floralaffair_PIN.jpg

Lights. Miniature lights, strings of lights, twinkling lights. No matter the season, to me they say, "there's a party going on right here." For this month's Cricut Design Space Star challenge, I wanted to work with light to make a unique party addition.

PC_cricut_floralaffair_2.jpg

Beginning with a 20-count pack of battery-operated lights, I decided to play with the Something Blue idea for a special bridal shower or an anniversary dinner party. Blue flowers, with a few exceptions, are tough to find, so we made some.

To create your own, you'll need a light strand, hot glue gun, vellum sheets, and scissors or a cutting machine (like a Cricut!). I created some petal shapes in three sizes, but all within an inch of one another.

PC_cricut_floralaffair_3.jpg

I uploaded the .svg file to the Cricut Design space. I set my Cricut to cut the vellum petals. I love the translucency of the layers of the vellum in light. To assemble, begin with the inner-most layer and glue the petals into a curling pattern around the center bulb.

PC_cricut_floralaffair_5.jpg

A really simple project, and since these are battery-operated, they sit nicely around a table setting, or down the center of a table, displayed around a cake, or even strung to add life to a boring corner.

PC_cricut_floralaffair.jpg
PC_cricut_floralaffair_4.jpg

Another Lucky #13 Cricut Challenge is coming your way, friends! This time our team created wedding and party decor. And I do have to say, I love all the possibilities!

Happy weekend, friends! Check out all of these wonderful projects from my teammates...

Lucky13_floral-affair.jpg
  1. The Sweet Escapes Floral Cake Topper
  2. East Coast Creative’s Photo Backdrop
  3. Andrea’s Notebook Floral Pinwheel
  4. Sew Creative’s Paper Bridal Bouquet
  5. Pars Caeli’s Flower Lights
  6. Petit a Petit and Family’s Birthday Kit
  7. Suburban Bitches’ Floral Chandelier
  8. Pretty Providence’s Simple Elegant Thank You Cards
  9. The Sweet Escape’s Wedding Cake Topper
  10. That Girl Katie’s Floral Vases
  11. Sew Creative’s Flower Girl Barrettes
  12. Simply Sadie Jane’s Flower Stamped Cake and Flower Party Hats

Also...

Cricut has just announced the second phase of the Cricut - I Made It! contest and this time they’re awarding one winner their own Make it Now™ project line to be sold in Cricut Design Space™!

To help create your line, Cricut will fly you to their headquarters in Salt Lake City to work side-by-side with their design team.  Then you and a guest will enjoy an all-expense paid stay at the Grand America Hotel – a luxury resort in Salt Lake City, home to the best skiing in the world.

The winner will be featured on Cricut.com and every time a Cricut user purchases your project, you’ll earn money. Cricut will even help with your publicity.

To enter the Cricut - I Made It! contest, all you need is a photo of an original project. You can upload up to five photos (which can be five individual projects or multiple photos of one project).

You have until September 30th to enter.  What are you waiting for? It’s time you Made It big! Head to cricut.com to enter today. 

Golden Pineapple Scarf for Cricut Design Space Star™

Disclosure: I am a member of the Cricut Blogger Network. I may receive prizes in exchange for my winning projects. Even though I am not being directly compensated for these posts, I am under consideration for a prize with Cricut Design Space Star. All opinions are 100% my own.

PC_pineapplescarf.jpg

Sometimes I like to push the limits. When I received my Cricut Explore machine for the Cricut Design Space Star, I wanted to see just what this wonder could do. What materials can I use? How big can I go? How intricate?

How small?

I designed tiny pineapples - like half an inch small - and watched as the Explore trimmed out every little fiber and leaf at the top of the fruit. Pretty amazing. Along with my talented and Lucky #13 team, I wanted to create something with gold. Enter the glitzy glamour of Cricut gold glitter iron on material.

Pineapples are on trend, and when you keep them ultra small, they can accent any outfit really well.

To make yours, gather:

  1. Neutral scarf (I loved the juxtaposition of the soft gauze with the bold glitter)
  2. Gold iron on material
  3. Cricut Explore
  4. Iron/ironing board
  5. Parchment paper 
PC_pineapplescarf_1.jpg

Step One: Design your tiny pineapples. I made an .svg file in Illustrator and uploaded them to the Cricut Design space. The program makes the best use of space for you! Switch the materials setting to Iron On, feed in your mat with the material in place, and watch the magic happen.

The precision of this task is pretty amazing.

PC_pineapplescarf_cricut.jpg

Step Two: Remove the iron on material from the mat. This process is known as weeding. You may want to use a Cricut tool to help you carefully remove each pineapple. I accomplished this task while watching some TV with my kids. It's really fun to see the shape, with such detail appear from the page.

PC_pineapplescarf_2.jpg

Step Three: Place your pineapples on your scarf in the desired pattern with the glitter side up. I did a line of fruit at each end and then a wide pattern for the rest of the scarf.

Step Four: With your iron on the non-steam setting, place a piece of parchment paper over 3-5 pineapples at a time. The iron on paper in the Cricut line adheres really quickly so you only need to move your iron back and forth over the parchment for 8-10 seconds.

Step Five: Remove the parchment and continue ironing the remaining pineapples.

PC_pineapplescarf_3.jpg

I love the flash and subtlety of the finished scarf. And I'm already planning my fall wardrobe around it.

Why not put a pineapple on it? xoxo, MJ

My team, Lucky #13, has put together a wide variety of incredible projects. And you need to check out every single one! Find the links below. Vote for and pin your favorite projects!

You can also search for our projects on this and upcoming challenges with #cricutdesignteam13

Cricutgearchallenge_Lucky13_fashion.jpg

Lucky 13 team in the Cricut Design Space Star™ team:

  1. Booties, Earrings, and Hearts from Andrea of Andrea’s Notebook
  2. Children's shirt and gold sandals from Celina of Petit A Petit and Family
  3. Cut out leather purse with cross lining from Erin & Tricia of Suburban Bitches
  4. Leather cuff from Monica of East Coast Creative
  5. Easy DIY hashtag t-shirts from Sarah and Jessica of Pretty Providence
  6. DIY umbrella and Pineapple Scarf from MJ of Pars Caeli
  7. Leopard leggings and tank from Sadie Jane of Simply Sadie Jane
  8. Laptop decals from Crystal of Sew Creative Blog
Lucky 13 team picture.jpg
DIY Umbrella on the Cricut Design Space Star™

Disclosure: I am a member of the Cricut Blogger Network. I may receive prizes in exchange for my winning projects. Even though I am not being directly compensated for these posts, I am under consideration for a prize with Cricut Design Space Star. All opinions are 100% my own.

PC_DIYumbrella_pin.jpg

I've wanted to turn my Pars Caeli cloud into an umbrella design for the longest time, with no tools to make it happen. And then this wild and wonderful Cricut Design Space Star contest comes blowing into my life, and I know exactly what I want my first project to be!

This cloudy umbrella is basically a no-mistake project. Vinyl shapes can be moved and removed without leaving marks or residue. The shapes cling easily to the coated material, and the transparency of the umbrella allows you to see what you're doing the whole way through. I had my first bubble umbrella when I was six, and I've loved them ever since. These clear canvases also pair beautifully with the opaque vinyl.

So now that we've all left our intimidation at the door, here's what you need to make your own:

  • Clear umbrella (this one is from Totes in a classic design)
  • White vinyl sheets
  • Cricut Explore
  • Gold paper or vinyl
  • Cloud and lining template

Step One: Design your pattern. Of course, I wanted clouds. Using Illustrator I created an .svg file. Based on the size of my umbrella, I made the clouds about three inches wide. I was happily surprised with how many clouds I could fit on one sheet. Using the vinyl setting, feed your mat with vinyl into the machine and carefully remove the cut clouds from your mat when complete.

PC_diyumbrella_cricut.jpg

I created another .svg file with the thin lining that rests on the bottom of the clouds. I changed the setting to paper, and fed in gold hammered scrapbook paper. These were fragile so removing them from the mats was a careful process.

Step Two: Next I wanted a GOLD lining for the clouds. I'm joining with a merry group of ten creatives for this Cricut Design Space Star challenge, and we had decided early on that we wanted our theme to be Gold is the New Black. And, do you know what's even better than finding the silver lining on a cloud? Yes, that's right, finding a gold lining.

PC_DIYumbrella_close.jpg

Step Three: Press the gold paper lining to the bottom of the white vinyl cloud. 

Step Four: Press the clouds to the interior of the umbrella. This will protect your design from the wear of the elements. I kept the clouds to the lower portion of the umbrella, with three on each panel, so that I could still see through the bubble. Decide on how much vinyl coverage you want on yours.

PC_DIYumbrella_1.jpg

We've had a rainy end to the summer, and this umbrella, with its gold lining reminders is the perfect way to stay happy and dry in the downpours.

If you love this idea, head on over to the Cricut Pinterest board, and repin! I am so appreciative of your support and kindness!

PC_designspacestarlogo.jpg

My team, Lucky #13, has put together a wide variety of incredible projects. And you need to check out every single one! Find the links below. Vote for and pin your favorite projects!

You can also search for our projects on this and upcoming challenges with #cricutdesignteam13

Cricutgearchallenge_Lucky13_fashion.jpg

Lucky 13 team in the Cricut Design Space Star™ team:

  1. Booties, Earrings, and Hearts from Andrea of Andrea’s Notebook
  2. Children's shirt and gold sandals from Celina of Petit A Petit and Family
  3. Cut out leather purse with cross lining from Erin & Tricia of Suburban Bitches
  4. Leather cuff from Monica of East Coast Creative
  5. Easy DIY hashtag t-shirts from Sarah and Jessica of Pretty Providence
  6. DIY umbrella and Pineapple Scarf from MJ of Pars Caeli
  7. Leopard leggings and tank from Sadie Jane of Simply Sadie Jane
  8. Laptop decals from Crystal of Sew Creative Blog
Lucky 13 team picture.jpg
Cricut Design Space Star and Fan Girl Fridays

Two fun, fun, fun announcements to share with you today, friends! First off, I'm one of the lucky bloggers chosen to compete in the Cricut Design Space Star competition!!! Secondly, Fridays just got a whole lot cooler with a fresh new collaboration with my best buds: Ellen of Minnow & Co., Emily Jeffords, and Paige of Approaching Joy Creative. Welcome to Fan Girl Fridays.

The lovely people of Cricut reached out to me a few weeks ago and wanted to know if I'd like to join in the Cricut Design Space Star challenge. I'd receive a Cricut Explore machine and have a team of fellow bloggers to work alongside. A free design tool and collaboration??? I was all over that.

So, I'll be asking for your help with some clicks and votes for me and Lucky #13 team. Our first category is fashion and gear, and I'm kind of over the moon excited to show off some new projects that you can create, too! Check in next week to see what came from our theme involving... G O L D.

In the Also Awesome category, I'll be posting every Friday now! Catch projects and posts Tuesday, Wednesday, Thursday, & Friday (gulp!). It's been a while since I've gone four days, but there are no other people in the world I'd rather spend my blog time with than Ellen, Emily, and Paige.

Beginning as a texting convo, we were all sharing our favorite bloggers and makers and artists - the sites that got us into blogging and the projects that moved us to begin. There are some really amazing artists out there, friends, and we are going to be doing a whole lot of appreciating around here. The four of us will be posting Fan Girl on Fridays (with links to one another) to show our love for the people that inspire, that have inspired us for so long. It's time they know they have a Fan Girl or two on their hands! Join in and share your favorites.

This was a tough week in the news, but a beautiful week personally. My hubs has made our anniversary (12 years) into a wonderfully thoughtful week of celebration, and I have some REALLY exciting developments for Pars Caeli that I cannot wait to share with you!!

Until next week, have a bright weekend, friends. And know that I appreciate you.

xoxo, MJ