Posts tagged Paige
For the love of blogging: The artist

What's going on, lovelies? I am so delighted to kick off this new Thursday series on Pars Caeli. As I mentioned last week during Melanie's book tour post, we are celebrating blogging and bloggers all throughout the month of April.

Pars Caeli is one year today (see the very first post)!! And though I'd love to throw some great contests and offer gifts, this blog runs on a $30/month budget so instead I'm bringing you inspiration and wisdom (with some laughs thrown in) as my gift. I've lassoed an amazing cast of bloggers from various backgrounds and experiences; some fresh on the scene and some with years of experience. I hope their passion (and mine) for the great big blogging universe will encourage you to go after your dreams, both big and small.

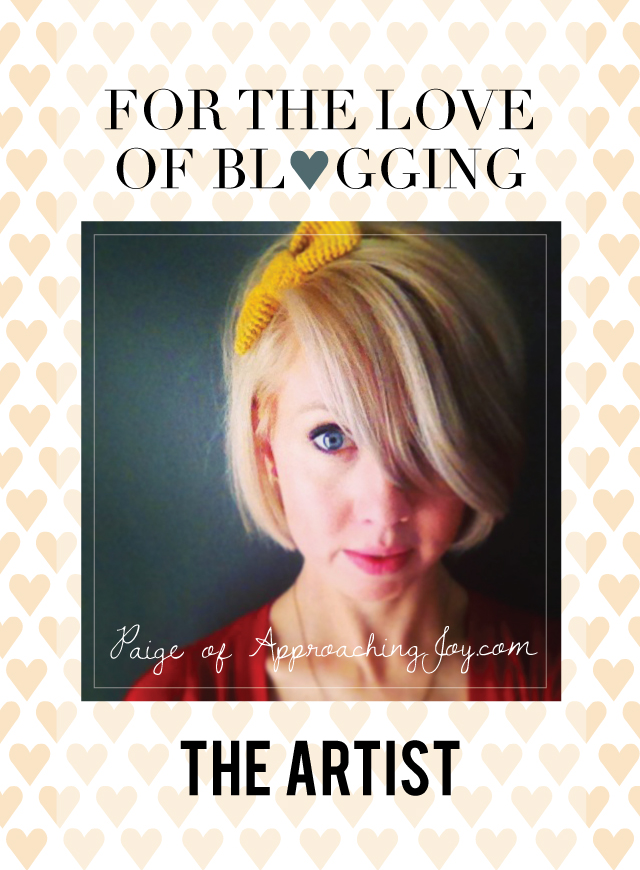
First up, Paige of Approaching Joy. **Disclaimer: Paige is one of my favorite blogger pals. She and I are headed on a great adventure in AltNYC in June!! One year ago, she was also the lady who pushed me off the blog diving board to click "publish."


I started blogging at Approaching Joy in late January of 2012.  Before that I had kept blogs for a few weeks at a time but always got frustrated when I couldn't make my space "pretty" and gave up quickly thereafter. I actually took a blog design class in conjunction with starting Approaching Joy so design was less frustrating... kind of...


I say "kind of" because, when I was taking that first blog design class I spent anywhere from two to three hours a DAY for two weeks trying to figure out what I wanted my blog to look like.  It bordered on obsessive, and I think my roommates thought I started an illegal drug habit (since I spent most of that time in my room, yelling at my computer.)  I think I even blogged mostly about blog design in that first (icky) period.


Luckily, it was just one of those things that I had to get out of my system and then I could turn my attention to fun stuff.


I keep blogging because (wow, this is going to sound horrible) but I kind of feel like it's my pixel-child.  

Newborn phase: Design, establishing, and not a lot of sleep.  
Toddler phase: Learning what I need to learn.  Links, code, etiquette, tantrums, etc.
Elementary phase: Going out, meeting people, having fun.
Angst-ridden teen phase: Where I'm at now.  Transitioning from blogging "what I should do" into "what I want to do."  Oh yea, total blog rebel over here.


Most of my best inspiration happens while I'm away from the computer. Pinterest is cool but, personally, nothing beats a walk on a trail, a cup of coffee at a local shop, or a drive down a dirt road to really get my creative cogs turning.


I feel like I know the blogger behind the screen in all the blogs I read. At times this means I am interested but intimidated, empathizing over rough spots, or taken aback by someone's hard work.


But always, always, I can see their personality, or else I won't keep reading.


(I choose to answer this question in a "Zombies just ate the Internet" kind of way, instead of a "my computer broke, sad day" kind of way.) If I had to stopping blogging tomorrow, I would lose a sizable chunk of my personal community. The people I've "met" through my blog have become friends and sisters, people who I share inside jokes with, people whose children I care about, people who make me smile on a day when everything else is gray.


Serious sadness.


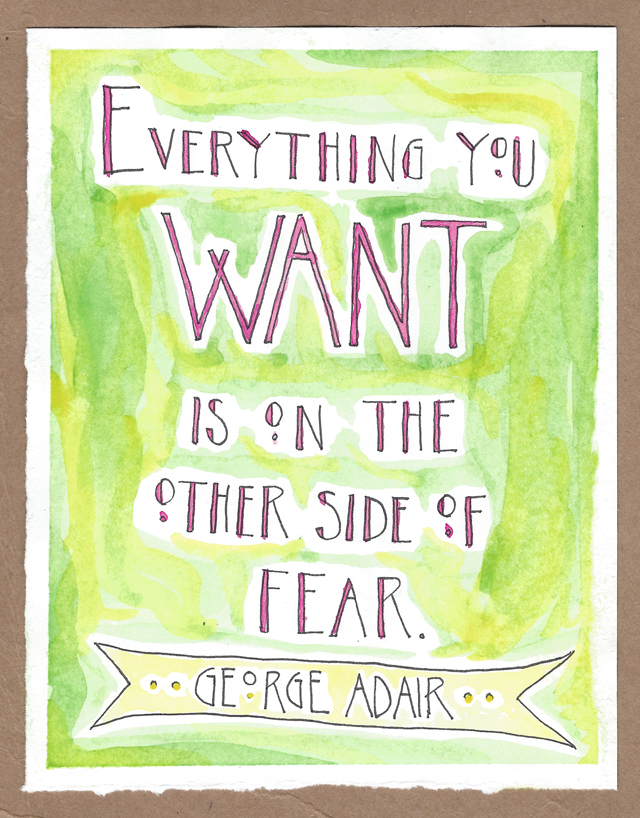
Outside of the blog I make art (which I am trying to work up the courage to share more often on the blog.)
Outside of the blog I make delicious dinners with my husband.
Outside of the blog I drink way too much caffeine, am allergic to the dogs I love, and try to be kind to everyone I meet.


I'm also trying to start a business that ties art into community and makes it a big part of my region's culture. But that's a big secret that I'm only willing to share with Pars Caeli readers.


Love it!! Thanks, Paige for gracing the pages of Pars Caeli and for your constant support throughout this first year. Follow Paige on Instagram at @approaching_joy to see some of her latest creations. And if you want to have some fun, engage her in some witty banter via Twitter.

Have a bright weekend, friends! I'll be saying a prayer of thanksgiving for each of you that stop by this site. It's been an eye-opening first year, and I hope to share so much more with you over the next 12 months.

xoxo, MJ

Party for Paige

Hi friends! Hi Paige!!

Please excuse our regularly scheduled Simple Tuesday post as we break out and celebrate a grand, old bridal shower (bloggy style) for Paige. For those of you who don't know beautiful Paige, she's an awesome writer and photographer who blogs over at Approaching Joy, and this talented beauty is getting married this weekend. I'm so delighted that Gina asked me, "Wanna do something for Paige?" My quick response? Yes, yes, yes!! Paige, we've gathered some great ladies who wanted to celebrate you!! They'll be joining in the blog hop, too - don't cheat and scroll down...yet.

Paige is a natural community-builder, and she is that girl you know you want to be friends with as soon as you meet her. Paige and I took an Alt Summit class together in early Spring, before I started blogging, and she is my shover. You know, like the person who pushes you out of the plane when you're all suited up and ready to go sky diving but you don't have the guts to actually jump. Yup, that's Paige. She's also been my parachute, supporting me and relying on me (making me feel knowledgeable) throughout this new(ish) adventure in our lives.

I was even blessed enough to receive the hippest wedding invitation ever, and I wish I could make my way to NW Arkansas this weekend...

Instead I'll be sending fabulous wedding thoughts and quiet marriage prayers down your way, Paige. I made a little something for you, taken right from your own webpages of wisdom and wit. I remember reading this for the first time on your blog many months ago and thinking Approaching Joy was named so well! I hope you and your man put your ear to the ground many, many times and recognize the great joy that is headed your way because of all the goodness you put out into the world.

When I got married 10 years ago, we asked our guests to offer some advice on marriage as a part of their response cards. We have them all in one big book now - the wonderfully sweet and outlandishly funny recommendations on how to live well with the one you love. Here's my 2 cents for you.. it may sound familiar.

Paige and I, in one of our many late night email chats, were talking life stuff, and she asked me how I do it all. God bless her, she doesn't see me in real life to know that I don't do it all or I may do it ALL but not so well. My answer was a lot of late night stream of consciousness and some kudos to my husband. My hubby and I have a lot of give and take. I take a lot; he gives a lot. We fill in each other's gaps. Through the thick, gritty nastiness and the floating, beautiful gifts of life, we've learned to laugh. To laugh at ourselves, to laugh at each other (I am an ug-ly cryer), to laugh at the bleakest situations, to laugh at our own shattered brilliances, to laugh at our children and our parenting, too.

If I really could be your fairy godsister and offer you one magical gift, it would be laughter.

Please laugh. It'll bind you together and carry you through. A lot. Let's laugh!

Enjoy the other amazing gifts our friends have brought, Paige. Thank you for being such a spectacular source of joy for me on the interwebs and in real life. Sparkle for me this weekend, will ya?

XOXO, MJ

Something new! Make It Mondays


Well, hello, friends! How was the weekend? We were busy bees over here, and I'm excited to welcome you to a new Pars Caeli feature, Make It Mondays!!

Every Monday we'll kick off the week with a fun project for your home, your children, yourself, or something else magical. You then have the whole week and weekend to find some time to fit the fun into your schedule!

Why the new addition? Three simple reasons: 1.You beautiful readers have eaten up the DIY posts I've featured here and there on the blog. 2. I'm always looking for ways that this webhome can be more helpful to your life outside of cyberspace (there is still one out there, right?). 3. I can't pass up an opportunity for alliteration wherever I can find it. :)

So, on with the fun...

I carved out time this weekend, between football games and birthday parties, for some prep of our St. Jude DIY date with other wonderful blogger friends. You and I have until Wednesday to submit pictures to Louise. Special thanks to Paige(who is right now living it up in NYC for New York Fashion Week!!) for thinking up this crafty goodness. To sum it up, we're all making kits for the Happy Craft Cart of St. Jude's Research Hospital. These baggies will contain the supplies needed to make a simple craft and lift a child's spirit in the process.

I knew that I wanted to grab my kiddos and get them involved in the creation of these bags. I've started a  Pinterest board for anyone who wants some ideas (go, go visit!!). Introducing my 7-year old to Pinterest was a trip. She's hooked.

We were blown away by a few crafts by Minieco, and we decided to give them a go. Have you seen her photos and crafts(wo)manship? Outstanding!!

Our first batch of Happy Cart Crafts will be baggies of these glitter paper beads. Some of the kits will have the beads already made so that younger artists (under 7) will still feel confident in their results, and other kits will have the paper and glittler glue needed to make it all from scratch!

This is an incredibly budget-friendly (slightly time intensive) craft that all three of my children enjoyed. Here's what you need:

  • Paper (we chose rainbow and only used one piece of each color paper to make all the beads here)
  • Scissors or paper cutter (I bought my Xacto cutter many years ago, and it comes in handy for these sorts of projects)
  • Glitter glue (really, any glue is fine, but glitter makes everything better, right?)
  • Skewer (you could also use a pencil or anything with a small circumference to wrap the paper)
  • String or twine for necklace/bracelet/anklet creations

First step? Cut isoceles (ish) triangles out of your paper. Ours were about an inch at the thick end.

Next, begin with the thick end and tightly (the key!) wind the entire triangle around the skewer. We made different shapes by doing this. Some beads were exactly symmetrical, some looked more like cones or party hats, and others looked like a wobbly top.

As you get close to the end of the wrapped paper, squirt a dollop of glitter glue on the front and back of the end tail and graciously smear it all over the end and the rest of the bead. This will help secure the tight wrap and spread the glitter around the whole bead.

Once the bead is secured, carefully remove it from the skewer and let it dry for a few minutes before crafting further. We spent an evening making all our beads and the next afternoon making accessories out of them.

My 7-year old REALLY got into this project. She's a talky crafter so I had the pleasure of hearing her elaborate on how good she felt creating something she knew would make other children–children who really needed it–happy. She alone made half the beads, and she made me very proud. Again.

She's anxious to make more Happy Cart Crafts, and we'll be sharing those with you, too! Beads like these work well when made from magazines, too. Maybe you and/or your kiddos would like to give them a try?!

And because little brothers like to get in on everything, here's little L's anklet.Thanks for stopping in on Make It Monday! It's gonna be a great week, friends.

XOXO, MJ

Vlog - DIY Make Your Own Patterned Bookmark from Children's Art

Tra la la la la, we made it! It's Friday, and I'm wrapping up a whole lot of work today. Feels so good.

My buddy, Paige (one of my major blog inspirers) is here today, readers. And she has brought an ah-mazing present! Enjoy, enjoy the first vlog we've had on this here blog...a charming DIY.

Paige is the head honcho over at Approaching Joy (you should also totally follow her on Twitter cause this girl knows how to brighten a day). Okay, let's be honest she's the only honcho, but she's one of those people who dig alone time. If you adore pretty things and slightly offbeat humor and have a propensity to enjoy small beautiful moments in life, you're probably already her friend. Go say "Hi" on her blog or Twitter (just make another tab and come on right back).

>>>>>>>>>>>>>>>>>>>>>>

Hey guys!!

As a *kid I loved going to the library.  It was a chance to learn about new people and cool places and let my imagination get even wilder. When I found out that the Pars Caeli family loved taking trips to the local library, I instantly knew about a project that would encourage both their reading and artistic skills: A "real" bookmark designed by your children (with some technical help from you) that they will be proud to use all summer.

*Confession: I'm still a proud bookworm.

Supplies:

Bookmark-supplies

Directions:

1.  Have your children use a jumbo marker to draw a simple image using the majority of the space on the  8.5 x 11 piece of printer paper, leaving a one inch border around the paper. (The marker size is important because it will give the image "weight" that is nice later on.)

2. Scan the image onto your computer and open in up into Photoshop or Photoshop Elements.

(After this step my written directions got a little... janky... so I made a screencast that you can watch where I go through every step.  Click on the link below, press play, and then hit the fullscreen button on the bottom right corner to see me in action!)

 Click on these words Bookmark DIY Screencast to watch the simple DIY!

Screencastbutton

3. Use the Paint Bucket tool and fill in the lines of the scanned image.

4. Crop the image so that the scanned edges are cut off.

5. Save this image.

6. Click the Edit button at the top of the screen and then click "define brush".

It will ask you to name and save the brush.

7. Create a new document that is 3x8.5 inches.

8. Choose the brush tool and select the brush that you just created.

9. When you first select the brush it will be the original size, but, with your child's help, decide how big the shape should be using the size tool to the right of the brush selector. Also, choose a color for the shape.

10. Use your new brush as you would any other to create a pattern or random design to create the background.

*As someone who only has six months of Photoshop experience it took me forever to realize that most brushes aren't supposed to be used as a "click and drag" motion but with a single click instead. Check out these tutorials (

here

and

here

) from

Creature Comforts

for more information on how to use brushes.

11. Use steps 1-7 to create a crush using your child's hand-written name

12. Use the rectangle tool to make a white square at the top of the bookmark.

13. Follow steps 8-10 to choose, adjust and use this second brush to fit into the white square.

14. Print out your bookmark (in color!!) on the white card stock.

15. Punch a hole at the top of your book mark.

16. Thread embroidery floss of similiar colors to your bookmark into the hole.

Ta-da!!!

A brand new personalized bookmark for your kids that will be a keepsake (with both their creativity and their handwriting) for you.

{MJ here. Looovvve it! And, as Paige's friend who's never met her in person (funny how the blogospheres work), I treasure hearing her describe it all. She's a belle from Arkansas, can you tell? So charming. Looks like we're making some bookmarks this weekend!!}