Rainbow Water Music
A quick and fun way to bring music into your summer! Create a scale with water and food coloring and let your children try out their own music.

A quick and fun way to bring music into your summer! Create a scale with water and food coloring and let your children try out their own music.

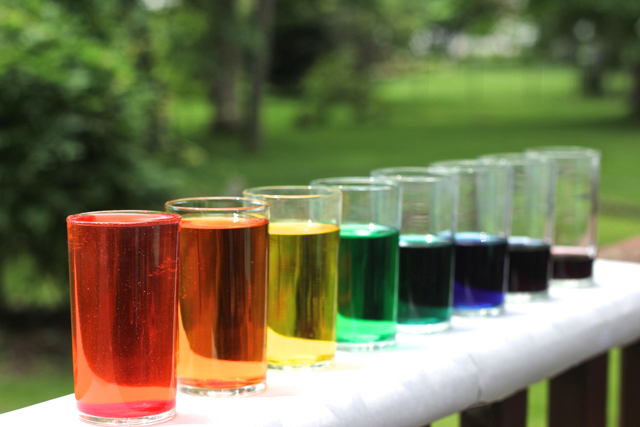
Water makes beautiful music! And through this simple activity with food coloring, eight identical glasses, and water, you can discover an entire musical scale.

In our home, we always have music playing (or are playing music) so when I saw this graphic on E is for Explore, I knew our kids would enjoy creating their own color-infused instrument. The beauty of this activity is that it's great for any time of year, uses what you already have, and clean up is super fast, too. It also teaches measurement and fractions, pitch, color mixing, and so much more!

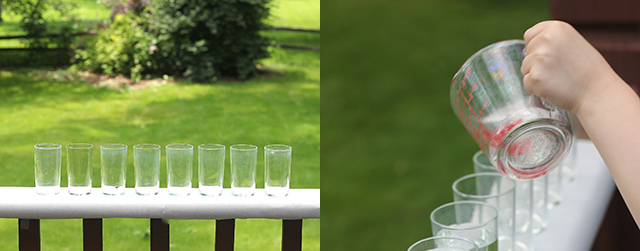
We used 8, 8-oz. glasses and filled them in with measurements of 8 oz., 7 oz., 6 oz., 5 oz., 4 oz., 3 oz., 2 oz., and 1 oz.. Once the glasses were full, we began the color process. Everyone was able to mix their favorite color with a wooden skewer until we have a spectrum of eight colors.

We used our silverware as the mallet for the water xylophone. At first, the kids just wanted to hit the full run of notes, up and down, along the sides. But the more they hit the glasses, the more they began to recognize music within the collection of sounds.

Can you name the tune we're playing?

We tried recreating simple songs that we all know. And as we did so, we adjusted the amount of water in each glass. Did that note sound too sharp? Or too flat? And we'd add or pour out water accordingly.

A quick and fun way to bring music into your summer! Create a scale with water and food coloring and let your children try out their own music.

A quick and fun way to bring music into your summer! Create a scale with water and food coloring and let your children try out their own music.

Have you ever tried this out for yourself? The food coloring is not necessary, but it definitely adds to the fun!! And perfect for a sunny day.

XOXO, MJ

P.S. Don't forget to check out all the ideas for the 18 Summers Challenge by searching for #18SummersChallenge. We're continuing with explosions and transformations tomorrow with our own volcanoes and soda pops!

Rock the Clock game
Make this fun learning game from rocks! Help your children learn how to tell time, figure out how much time has elapsed, and discover the world of timezones. Perfect summer project.

Make this fun learning game from rocks! Help your children learn how to tell time, figure out how much time has elapsed, and discover the world of timezones. Perfect summer project.

We're learning the fun way this summer! And what could be better (or easier) than rocks and some paint? I'm so excited to share with you our favorite new learning activity for preschoolers/K, early elementary, and even middle schoolers.

Sometimes my children stare at an analog clock, trying to read it quickly. It feels a bit like a foreign language since our electronics and nearly every clock in our home is digital. We created this game to help them be able to take on time with confidence and to have some fun with it in the process.

To make a Rock the Clock game, you'll need a square canvas, 24 rocks (12 larger, 12 smaller), rainbow paints, a white paint marker, and craft glue/hot glue. As the backing, I used a canvas I found on clearance at a craft store. Its image is not one that I wanted to hang, but I knew the canvas frame would come in handy. Using the frame like a tray, I painted the edges black to contrast with the rainbow rocks.

Sorting the rocks into two main piles, large and small, I selected one from each pile to paint a shade of the rainbow. Remember that the large rocks will be numbered with hours and the small rocks will have the minute numbers on them. I recommend two layers of paint on your rocks to make sure that the colors are nice and saturated.

Once the rocks are painted and dried, add numbers with the paint marker. Let that dry and then glue the rocks onto the canvas. In the center, you can paint or place a simple circle or press a blob of playdough to hold the hands of the clock. We made our hands from two twigs and painted them in different stripe patterns so that it's easy to talk about the big hand (that's black and white) or the small hand (that's orange and blue).

Make this fun learning game from rocks! Help your children learn how to tell time, figure out how much time has elapsed, and discover the world of timezones. Perfect summer project.

Make this fun learning game from rocks! Help your children learn how to tell time, figure out how much time has elapsed, and discover the world of timezones. Perfect summer project.

DOWNLOAD ROCK THE CLOCK FOR EARLY ELEMENTARY

For L, our emergent reader, we used the elementary version of Rock the Clock. A stack of cards, with times of o'clock and thirty are an easy way to begin. I sat next to him as he showed me on the clock what the time on the card said. I was amazed how quickly he wanted to move into the quarter hour times because, with the visual of the rocks and the numbers, he understood how the big hand works. Learning is amazing to watch.

Make this fun learning game from rocks! Help your children learn how to tell time, figure out how much time has elapsed, and discover the world of timezones. Perfect summer project.

Make this fun learning game from rocks! Help your children learn how to tell time, figure out how much time has elapsed, and discover the world of timezones. Perfect summer project.

DOWNLOAD ROCK THE CLOCK FOR ELEMENTARY

For C, our new 3rd grader, we made a new set of cards. Her times are set to the 5-minute increment. She wanted to be a bit more independent so I offered her the option of taking a photo of the clock and the card next to each other and sending it to me!

This is a great idea for working parents!! Ask your child to set the clock to the time they woke up and text it to you.

Also, to challenge her further, the second set of cards asks her to calculate how much time has elapsed from a start time to an end time. She can use the rock clock to count through the minutes and hours and write down her time.


DOWNLOAD ROCK THE CLOCK FOR TIME ZONES AROUND THE WORLD

And for M, who wants to travel the world, I adapted this as a learning tool for world time zones. Using the printable map, she can discover new countries and relate to how life might be the same or completely different there. I have a lot to learn on this one, too, so I'm excited to learn side-by-side.

We think we may turn the game into a working clock at summer's end since we can't resist a good rainbow craft, but who knows. Simple tools like this are amazingly helpful to boost learning and take understanding to a whole new level.

Know anyone who might enjoy creating and playing with Rock the Clock? Send this post along!

XOXO, MJ

Citrus Floral Centerpiece

Good Monday morning! I'm delighted share a special project with you that is featured in the second issue of a fabulous online magazine called Merry, created by my friend Melissa of The Sweet Escape.

Slices of citrus add the color and the vibrancy to summer's blooms!

Slices of citrus add the color and the vibrancy to summer's blooms!

The toughest part of this centerpiece is finding just the right vases. You're looking for two that fit nicely inside of each other, with a quarter to a half an inch gap where you can add in the fruits. Oranges, grapefruit, limes, and lemons will last for a few days with no maintenance.

Some of summer's best treats come in the warm temperatures, the sun-kissed colors, and the gorgeous florals. Using two glass vases of similar shapes, you can create a lovely combination of all the bests of the season. With a mixture of grapefruit, orange, and lemon slices, the walls of the centerpiece become a showcase of citrus. Pair these circular slices with voluminous peonies for a blend of beauty and a delight for all the senses.

Pairing similar tones makes for a sweet bouquet of freshness. Consider also a sharp contrast with an aloe plant or tropical variety for the inner vase!

Merry Mag is a beautiful online magazine showing you the best projects for the sweet summer hours. Browse through the 98 pages of goodness at Merry Mag.

Merry Mag is a beautiful online magazine showing you the best projects for the sweet summer hours. Browse through the 98 pages of goodness at Merry Mag.

Congrats to Melissa and to all twenty contributors on a lovely summer resource. Head on over to Merry Mag to see ninety-eight pages of photos and projects to make you swoon!

xoxo, MJ

P.S. If you're joining us for the 18 Summers Challenge, we're making music tomorrow with water and glasses. Break out the food coloring!

Painted Terra Cotta Pot Garden
Take a great recipe to the next level! Plant a pot full of the ingredients and add the ingredient list, handwritten on the pot. A fabulous teacher present, too!

Take a great recipe to the next level! Plant a pot full of the ingredients and add the ingredient list, handwritten on the pot. A fabulous teacher present, too!

Summer is the best time to be outside! We love getting to know local plants and flowers and planting our family garden is a highlight of the summer's start. Frequent visits to the nursery for vegetable and herb plants are just a part of our summer ritual. The kids love to touch and to smell each plant, and I love that they are more interested in the meals and dishes we create with the plants that they have grown (bonus!)!

As a fun extension of our usual veggie patch, we decided to make a special garden for one of their new favorite foods - salsa! Tacos, burritos, and guacamole have been added to our menu planning, and the kids expressed interest in making our own version.

Add your favorite recipe with a paint marker and plant a garden just for this dish! Makes a wonderful hostess gift or teacher present.

Add your favorite recipe with a paint marker and plant a garden just for this dish! Makes a wonderful hostess gift or teacher present.

With so many great salsa recipes out there, you likely already have your own blend, but if not, try this one from Lulu the Baker or Cooking Classy's restaurant style. We know that not every ingredient is readily available locally so we put together what we could find.

The supplies are simple on this one: one large terra cot pot, outdoor paint (one that seals the pot for you), a white paint marker, and your plants. Perhaps your garden will be an Italian selection for pesto or a French selection of tarragon. Pick your recipe and then select your plants, keeping in mind that some might need to be transferred as they grow larger.

In our salsa pot, we have roma tomatoes, two cilantro plants, and a few yellow onions. It smells so delish! And it's already brought so much happiness before we even get to the final product. Seeing my children enjoying the gifts of nature is a fabulous part of our 18 Summers Challenge. And M loved making one as a year-end present for her teacher, too!

Give a mini garden of all the best ingredients for a wonderful salsa and write the recipe right on the pot! Great teacher gift!!

Give a mini garden of all the best ingredients for a wonderful salsa and write the recipe right on the pot! Great teacher gift!!

What would you plant?

xoxo, MJ

P.S. Are you joining in the projects we're creating for this summer together? Up tomorrow, a fun game called Rock the Clock. Get those stones ready.

P.P.S. If you want a sneak peek into all that's ahead, including supply lists, subscribe to the Pars Caeli newsletter by adding your email below.

A nature hunt in your backyard

This post is sponsored by Sprout by HP, but the project and thoughts are all mine. Thank you for your support of the brands that support Pars Caeli.

So many wonderful summer, childhood memories can be created right in our backyard. Literally. Though I've lived in multiple locations, I can vividly remember the natural details within the backyards of our homes. One had a grape arbor, one a favorite cement patch and views of cows at pasture, and another the sweet smell of lilacs. A returning summer goal of mine is for my children to spend more time outside, in our yard. I want them to run/jump/climb and to use their broad imaginations to create, and to learn about the natural classroom we have right outside our door.

So, I decided to make a game of it. A scavenger hunt! With three children, ages 5, 8, and 10, I wanted varying levels of difficulty so I decided to make a printable that they could all use.

Create a scavenger hunt out of leaves, branches, and blooms for the backyard. Help your children learn how to identify the environment around them through this fun game!

Create a scavenger hunt out of leaves, branches, and blooms for the backyard. Help your children learn how to identify the environment around them through this fun game!

Here's how it works:

  • The 5-year old gets to take me on the journey as he finds and identifies each of the items.
  • The 8-year old will write down the names of the trees, plants, and flowers on the printable. She'll have to identify what she can from memory.
  • And the 10-year old will learn even more about these natural beauties by looking through our field guides (like the ones below). She's a lover of words and etymology so she's excited to take on some Latin roots.

I went out to the yard with camera and bucket in hand, ready to collect treasures. It's important to me that my children be able to identify local trees, plants, and flowers so I added samples of the varieties that we have in our yard.

For our printable, I used the HP Sprout to make photo-realistic images that I could manipulate quickly. I love creating special projects for my children, but I don't have a ton of time to do so. The Sprout was super helpful on this!

I captured the twelve items, rotated them on the page, and scaled them for a two-column layout. I could see keeping them on the computer, too, so that the kids can make their own pictures with our backyard features.

The HP Sprout helps make any three-dimensional object into a two-dimensional piece of art! We used these natural elements for a scavenger hunt of our backyard.

The HP Sprout helps make any three-dimensional object into a two-dimensional piece of art! We used these natural elements for a scavenger hunt of our backyard.

GET YOUR PRINTABLE HERE.

I'm excited to explore!! We all need to understand the world around us more, and this is a wonderful summer learning game, too.

How do you make the most of your outdoor space?

xoxo, MJ

Other fun options with a nature's scavenger hunt could include taking photos of the leaves and flowers in your yard and printing them out for children to identify and find. You could also have them use the found objects from the bucket to run around and put them back in their natural habitats. This is a great opportunity to talk about each plant and variety!


What would you create with a Sprout?

P.S. Did you see how else we've used our Sprout?

Strawberry Shortcake Stars

It's strawberry season! And picking time is our favorite. Today we're enjoying the sweet flavors of strawberries with a fun take on a traditional strawberry shortcake that leans a bit more to the messy and child-loving side.

Strawberry Shortcake Stars are a treat perfect for July 4th or any star-studded celebration, like the end of great day!

Strawberry Shortcake Stars are a treat perfect for July 4th or any star-studded celebration, like the end of great day!

The kids and I love to bake together so we'll be sharing more recipes like this during the 18 Summers Challenge, and we all love strawberries so this was a win win for us. Not every day is a great baking day, though, (remember those ideas I gave for having success with your kids in the kitchen?) so I waited until L and I had some time to ourselves to create treats for the rest of the family. Give yourself about an hour from start to finish for this recipe and enjoy the mess of flour and dough. It will happen. And the messy will likely be your child's favorite part so do your best to set aside the need to keep tidy.

Take a plateful (or about 4 cups) of sliced strawberries to make a family portion of Strawberry Shortcake Stars.

Take a plateful (or about 4 cups) of sliced strawberries to make a family portion of Strawberry Shortcake Stars.

Preheat your oven to 425ºF. We adapted this recipe for easy strawberry shortcakes from Just A Taste, Here's what you need:

  • 4 C sliced strawberries - we cut ours super small for little mouths and hands
  • 2 T sugar

Mix these two together and set aside while you're making the rest of the recipe.

  • 2 C flour
  • 3 t baking powder
  • 1/2 t salt
  • 1 C heavy cream, plus additional for brushing on shortcakes
  • Sugar for sprinkling on top (optional)

For the whipped cream:

  • 1 C chilled heavy cream
  • 1/4 C sour cream
  • 4 T sugar
  • 1 t vanilla extract
Mix these strawberries and 2 tablespoons of sugar together and set aside while you're making the rest of the recipe.

Mix these strawberries and 2 tablespoons of sugar together and set aside while you're making the rest of the recipe.

Stir together the sliced strawberries with the sugar (a great job for little hands). Set aside. Be sure to take in the delicious smells of fresh berries.

Mixing and kneading are great skills for children to accomplish. Make these yummy Strawberry Shortcake Stars with your kids!

Mixing and kneading are great skills for children to accomplish. Make these yummy Strawberry Shortcake Stars with your kids!

Whisk flour, baking powder, and salt together in a large bowl.

Add the heavy cream. Form the dough into a ball within the bowl and then move to a lightly floured surface for kneading. Not much is necessary, only one or two pounds to be sure you don't have tough cakes.

Roll the dough to about 1/2-inch thick. With a star cookie cutter (we used one 3" wide), cut out shapes and transfer them to the baking sheet. We were able to make 10 stars from our batch. Gently pour less than a teaspoon of heavy cream on each and sprinkle with sugar.

Bake for 15 to 17 minutes or until they're golden brown.

Cookie cutters are handy all year round! Strawberry Shortcake Stars.

Cookie cutters are handy all year round! Strawberry Shortcake Stars.

Let those cool while you put together the cream. Make sure the ingredients here are very cold. We had ours a little warmer and the cream was extra melty but still delicious!

Mix the heavy cream, sour cream, sugar, and vanilla extract with a mixer on high speed. Continue until peaks form.

Strawberry Shortcake Stars are a treat perfect for July 4th or any star-studded celebration, like the end of great day!

Strawberry Shortcake Stars are a treat perfect for July 4th or any star-studded celebration, like the end of great day!

Creating your shortcake is as wonderful as sandwich making. Slice the stars horizontally to create a top and bottom piece. First add a layer of cream, and then 2-3 spoonfuls of strawberries. The amount of cream and strawberries you add makes it more or less a sandwich treat. Some enjoy shortcake with a fork anyway.

This easy recipe for strawberry shortcake is one that you can do with the kids! Find more info on Pars Caeli.

This easy recipe for strawberry shortcake is one that you can do with the kids! Find more info on Pars Caeli.

Little fingers won't be able to stay away from these delicious strawberry shortcake stars, the simple, delicious way to use in-season berries.

Little fingers won't be able to stay away from these delicious strawberry shortcake stars, the simple, delicious way to use in-season berries.

We loved eating these as open face treats, too. This allowed for extra dollops of cream and more heaping helpings of strawberries!

Have you made any strawberry treats this season?

XOXO, MJ

P.S. For those following along with the 18 Summers Challenge, we'll be going on a hunt in nature tomorrow! Printables, printables, printables!!

Summer Reading Printable
Make summer reading goals fun! Use this gumball machine printable to set goals and show progress. Printing now!

Make summer reading goals fun! Use this gumball machine printable to set goals and show progress. Printing now!

The best part of summer is . . .

We'd all fill in the blank just a little differently, right? For me and my oldest daughter, summer reading would be right at the top of the list. The freedom to select any book, the great expanse of time (at least in childhood) to immerse yourself in the story, spending lazy afternoons in a hammock with your favorite characters!! So good.

Our local library does a wonderful job of incentivizing time spent reading, encouraging children to track every 10 minutes spent reading or listening to someone read to them. For every 10 minutes, they color in a bubble on a big sheet to keep track of how much reading they're doing. Once they build up to 250 minutes, they receive a fun pack of restaurant coupons and stickers. The 10-minute increment feels like just enough for my 5-year old, and my 8- and 10-year olds can't wait to rack up bubbles. I like that it's time spent reading and not number of books or pages because those often move all of us to speed read or breeze over some of the best books!

Is reading a favorite part of your summer? Try this to help your children adopt the same interest! Free printable.

Is reading a favorite part of your summer? Try this to help your children adopt the same interest! Free printable.

Inspired by the good work of our local library, we created our own goal this summer - a family goal. How much time will all five of us (parents included!) spend reading? Knowing that the girls that spent 24 and 27 hours in reading last summer, we went big and bold with 100 hours as a family!

We're already digging in.

Set a family reading goal this summer! Let your children know that reading is important to you, too.

Set a family reading goal this summer! Let your children know that reading is important to you, too.

To track our family progress, we created this poster-sized gumball machine printable. For every ten minutes any of us reads, we get to stamp on a gumball. We have a ton of the dot markers from preschool days so we're using those as the gumballs, but colored circles or dot stickers would work just as well.

We've only just begun, but it's already fun to see all that we can accomplish together. And from previous summers I know that the joy of filling in a bubble or stamping a gumball quickly transitions into the delight of a good plot and the joy of moving the bookmark.

I created a letter-sized printable for your children to track their goal and work to reach it! Post the gumball machine somewhere that everyone can cheer along (and make sure it's cheer only and not criticism). You can, of course, do individual tracking with this free printable or subscribe to the newsletter and get a free printable poster to track family goals.

DOWNLOAD YOUR PRINTABLE

SUBSCRIBE FOR THE POSTER

We haven't pinned down what our final goal will obtain - maybe a trip to the bookstore with a book for everyone? Or a field trip into the library in Chicago? Undetermined but I love that none of us are too worried about it. It's the reading in between that brings the most fun.

If you're joining us in the 18 Summers Challenge and are wondering what's up for tomorrow, we're making the most of strawberry season with an easy strawberry shortcake that you and the kids can create together. Or you can make it all for yourself because strawberries are good for you, right?

xoxo, MJ

Displaying Children's Artwork

We are almost in the final countdown until the end of the school year! Our family is limping across the finish line a bit, as we typically do, just worn from the extra activities that seem to pop up to celebrate endings and new beginnings.

Every summer is a new beginning for us, too. We make it a point as a family to try new activities we've been itching to get into, and to make learning all about our passions and curiosities. Mommy and Daddy school, a time for two teacher alums (the hubs and I) to share in the learning enrichment, has been a highlight of our summers since the kiddos were toddlers. You can find all of our posted ideas here.

The best ways to decorate and to enjoy children's artwork without letting it overtake your home!

The best ways to decorate and to enjoy children's artwork without letting it overtake your home!

With the #18SummersChallenge approaching in June, I have my mind on creating, crafting, and summer bliss! (By the way, have you signed up to join in on that fun yet? Subscribe to our newsletter to get weekly supply lists and great ideas to make the most of summer!)

But, with creating comes a lot more stuff in the house - papers, sculptures, found objects, and more - that need to find a home. I clear out folders for flat work, make room on a side table for three dimensional creations, and ready art display areas to showcase our fun. And I'm always looking creative ways to decorate with our children's work. Artwork created by small hands makes a home warmer and adds a touch of whimsy and life, don't you think?

1. Hanging gallery - We have one of these in our playroom, complete with clothespins. Haeley from Design Improvised made this one along with her daughters, and the whole process would be a fun way to get children involved in putting together their own space!

2. Covered canvas frames - Create Studio assembled a museum in the making with a great collection of frames ready to go for potential pieces. I feel some curating in our future for these painted beauties.

3. Construction paper quick ones - These paper frames are an easy fold and hang solution from Serving Pink Lemonade. Children can practice their cutting skills, too (bonus!).

4. Rail and clips - I love this solution on HGTV for an old school feel. Pair a vintage yardstick with colorful clothespins for a unique hanging display. This would coordinate so well with our playroom/homework area.

5. Fancy string - Taking the hanging gallery to the next level, why not use pom pom fringe or sequin notions? Special ribbons or different colors for each child would add a nice touch, too.

6. Box gallery show - What if you threw a gallery launch? Love this idea from Casa Maria for a pop up installation of kids art! Invite relatives and neighbors over for lemonade as they browse through the latest creations.

7. Cork tiles - The modern edge on this gallery is what caught my attention. Janssen of Everyday Reading has a bright, clean space that is sure to inspire.

8. Stairway gallery - This classic look is brought to today's styles with the crisp white framing that is featured on each artwork. We're currently creating a collection on our stairway with a similar look, and I'm looking forward to sharing it with you all!

9. Rock gallery - These shadow boxes are my fave for taking simple collections (of which we have SO many) to museum-level beauty through repetition of shape or color. I can imagine the shell collection, hama bead art, and eraser assortments finding happy homes in these boxes on display!

Do Good letterpress 8" x 10" print, available soon in the Shop at Pars Caeli.

Do Good letterpress 8" x 10" print, available soon in the Shop at Pars Caeli.

Our latest display technique are these vintage pants hangers that I purchased from Julia over at Tag & Tibby over a year ago. They are both unique and quirky enough to equal the charm of some of our most unique pieces.


DIY Picture Frame Dry Erase Board

Looking for an easy gift to whip up? One of our favorites is the DIY Dry Erase board that can add some personality to your message keeping.

Looking for an easy, quick gift? Turn any large frame into a patterned dry erase board. Simple how-to on Pars Caeli!

Looking for an easy, quick gift? Turn any large frame into a patterned dry erase board. Simple how-to on Pars Caeli!

The color (?) white has grown on me in recent years. But I will admit, I'm a true color lover so the idea of making a white board not so . . . white is right up my alley.

All you need is a larger frame (for a better writing surface), fabric, scissors, and sturdy tape. Pick fabric you love, but remember to keep it light enough that your writing will still show, and subdued enough in pattern that the fabric doesn't distract from the messaging.

All you need: fabric (preferably one lighter in color with subtle patterning), scissors, large wall frame, and tape.

All you need: fabric (preferably one lighter in color with subtle patterning), scissors, large wall frame, and tape.

Simply wrap the frame backing as you would a present, maintaining a tight pull on the fabric as you secure it with tape. The corners are the trickiest so trim as you need to be sure to get a flat finished edge.

My two daughters share a room so we created two of these blue marbled boards to unify their spaces. And I love that the boards are lovely pieces of art when not used for the latest homework tracking or doodling.

Looking for an easy, quick gift? Turn any large frame into a patterned dry erase board. Simple how-to on Pars Caeli!

Looking for an easy, quick gift? Turn any large frame into a patterned dry erase board. Simple how-to on Pars Caeli!

Fabric can be easily removed when you're ready for a new pattern, too! Way easier than repainting a room, wouldn't you say?

Looking for an easy, quick gift? Turn any large frame into a patterned dry erase board. Simple how-to on Pars Caeli!

Looking for an easy, quick gift? Turn any large frame into a patterned dry erase board. Simple how-to on Pars Caeli!

What do you prefer a white board? Or a dry erase board with personality?

xoxo, MJ

The Challenge of 18 Summers
Join in a summer's full of activities and childhood joys on Pars Caeli. Every week, new ideas for ages 5-10, with supply lists ready a week in advance for big projects.

Join in a summer's full of activities and childhood joys on Pars Caeli. Every week, new ideas for ages 5-10, with supply lists ready a week in advance for big projects.

"Next year, he's off to college, and this is his last real summer at home. I don't know yet what we're going to do. I feel all this pressure, and I want to make it special, make the most of it."

My oldest is only 10, but I felt that same heart pang. I saw the softness in this mother's eyes--she, the amazing parent of eight children, ranging ages 3 to 18--as we chatted during t-ball team pictures. How do we make the most of the time we have with our children, while they're still at home?

I feel that pang a lot when it comes to childhood summers. I want so much the continual carpe diem experiences for my children. The bliss of chasing butterflies matched with the incredible camp that opens their eyes to new possibilities. The right amount of boredom to find the space to create their own adventures. The time making family memories together and traveling to see new places.

"One day you will wake up and there won't be any more time to do the things you've always wanted. Do it now." - Paulo Coelho

And, much like the mom that I was chatting with, I do put a lot of pressure on myself. I have a feeling I'm not the only one.

So how do we do it? Provide the planning and energy to make memories happen and mix it with the ease and the relaxation to allow spontaneity at its best.

Frankly, I'm not sure. I'll likely stress about it and not do enough BUT nevertheless I'm inviting you into our summer journey to try some bucket list activities, to relive some of the joyful activities of our own childhoods, and to experiment with new projects! For newsletter subscribers, I'll send a supply list every Friday so you can join along and preview future ideas. No worries, most projects will include easy items you have right in your home.

And I want to see what you're up to with your children, from infant to college age. How do you make the most of the summer together? Share your tweets and photos using the hashtag #18summerschallenge, and I'll repost select ideas to help us all!! And don't forget to share and to subscribe to be a part of the best summer of childhood.

We can do this, enjoy our times together and make them memorable. Cheers to a wonderful summer ahead.

xoxo, MJ


Loving your age
Limited edition Do Good letterpress print will be a part of Shop Pars Caeli later this month!

Limited edition Do Good letterpress print will be a part of Shop Pars Caeli later this month!

So this is the view from four decades on the planet. Today is my birthday, my 40th birthday.

I wasn't completely sure I was going to share that with you.

And that took me down a rabbit hole of why nots.

It seems from my perch that these days aging is set up to be feared, or at least avoided, in our society. We all (me included!) want to look younger, to act younger, to be mistaken for younger than what we really are. Sending wishes of gladness that 40 is the new 20 is a fun way to extend youth.

But what if we went back to the notion that elders are respected and revered?

Or even more what if we entered a whole new era where aging is the best thing there is? Remember how anxious you were to turn from four to five? Or eighteen? 21?

How does Pitbull say it . . . Any day above ground is a great day. (Oh man, I'm quoting Pitbull now.)

Friends, I've lived forty years! And rather than dread it (like I thought I was going to), I feel truly, honestly grateful. I've lived in many different places, had a bountiful number of experiences, and been touched by the most loving individuals. I even given birth to three of them. I've made little and BIG mistakes. I've had to learn from them. I've hurt people and loved people and celebrated people. And I've grown and changed and stayed the same.

I'm more wrinkled and saggy. More tired and cynical. No, I can't jump as high, nor run as fast.

But I am here, friends. I have another day, week, month, and hopefully years to do my best to add love into the world and to be deeply grateful for the gifts I've been given. How amazing!! And I've had 4-0 such opportunities.

I'm not bragging, but being around to love and to be loved for forty birthdays feels like a pretty giant blessing.

God is Good limited edition letterpress print will soon be available at Shop Pars Caeli.

God is Good limited edition letterpress print will soon be available at Shop Pars Caeli.

One of my great blessings is this space right here where I can share what's on my mind, in my heart, and all over my studio floor. I'm so honored to have you lovelies over here, and I so so appreciate your support and encouragement.

So let's celebrate another year!! Are you brave enough to share your age?

xoxo, MJ


5 Gifts to Give Yourself this Mother's Day

Of this I am convinced: there are an infinite number of ways to be a wonderful mother. There's no secret recipe or way that you need to adapt your personality. Your children need all the you-ness you've got.

We mommas can be hard on ourselves. We can focus on what needs to be done more than the goodness that is. And Mother's Day is a fabulous time for us to breathe, to step back, and to bask in the joy that is each of us (remember that?).

With that in mind, with you in mind, here are five gifts to give yourself for the special day.

1. The space for calm or silence

Mothering is loud, messy, and constant. And those three aspects are amazing - when taken in good doses. Give yourself time away (even if it's 10 minutes with music) to inhale deeply all that awaits you and to exhale all that has been. Some of us love the stillness of silence and other would be calmer with our favorite tunes blasting. Whatever gives you a break, take it.

2. The space for physical relaxation

Children can physically wear you out. Mother's Day is the right time to go for a long walk, a good run, an extended massage, a magical bath. Reward your body for all the effort it goes through in the everyday experience of motherhood.

3. The opportunity for a fresh look

You give of yourself and sometimes (only sometimes) you make time to be good, really good to yourself. Look at yourself with fresh eyes! Try out some new colors, a different hairstyle, a red lipstick. Granted, these changes are only surface level, but sometimes actually seeing yourself look different allows you to free up some of those preconceived ideas of who you are.

4. The time to relish

I usually want to spend happy time with my kids on Mother's Day, but tantrums, activity schedules, lack of sleep, and a handful of other things can make the day feel like it's out to get me, rather than celebrate me.

For your Mother's Day, you may or may not choose to be with your children. Regardless of this, give yourself the time to remember wonderful moments in the lives of each of your children. Imagine the scenes again that brought easy laughter to you and your children. And reflect on your positive role in their lives.

5. The time for creativity

Time to fill up your bucket. Are you a reader? Love to journal? A big movie buff? Being a great mother means you make time to develop you. Children need strong role models, right? Show them that learning and using your God-given talents is important to you, too.

And get out the oil paints. Or scrapbook supplies. Or leotards.

Give yourself some extra presents this year. You deserve it, momma.

xoxo, MJ


Printable Mother's Day Card

This post is sponsored by Sprout by HP, but the project and thoughts are all mine. Thank you for your support of the brands that support Pars Caeli.

Mother's Day is just a few days away, friends! Are you ready to celebrate the mommas in your life? I've been looking at cards for the passionate mothers I know. And I have to admit that what I found fell a little flat. The racks were filled with more pastels and nostalgia than what fit these go-getter moms that I want to honor.

So I decided it was time to make my own. You know I love printables!  After a quick trip to the store, I was inspired to incorporate the beautiful tones and textures of the citrus, vegetables, and blooms. I mean, peonies!!

Typically I'd need to illustrate these props or photograph them, but with the new Sprout by HP I have greater possibilities. The Sprout is a touchscreen PC with a built-in overhead scanner, and it gives you the freedom to capture both 2D and 3D objects. I can scan anything, flat or dimensional, in a matter of seconds and quickly incorporate it into any design that I've created. I'm a big fan of the touch mat/touch screen combination because they work together so seamlessly and allow an even bigger canvas or the functionality of two work surfaces.

For the Mother's Day card, I wanted to use limes, lemons, artichokes, peonies, nectarines, and kiwis - the most vibrant textures and colors I could find. Putting wax paper on top of the touch mat, I created images of each of the props.

With the touch mat, I could resize, edit, and move around each shape to create just the look I wanted for my design. I love it when work feels like play and the hands-on quality to the Sprout makes everything feel like childhood fun again.

Mother's Day card made modern. For the passionate, go getter mom in your life! A free printable card from Pars Caeli.

Mother's Day card made modern. For the passionate, go getter mom in your life! A free printable card from Pars Caeli.

I found this wonderful writing from Oliver Wendell Holmes, Sr., that seemed to fit perfectly. Have you read it before?

Youth fades.
Love droops.
A mother's love outlives them all.
Mother's Day card made modern. For the passionate, go getter mom in your life! A free printable card from Pars Caeli.

Mother's Day card made modern. For the passionate, go getter mom in your life! A free printable card from Pars Caeli.

Get your free Mother's Day printable card here. It's sized to 5 by 7 inches so that you have plenty of room on the interior to say all that you need to say. So pop in a nice piece of white cardstock and get to writing! Or, if you're looking for something to give? Why not trim this one to the cover alone and frame it?

Mother's Day card made modern. For the passionate, go getter mom in your life! A free printable card from Pars Caeli.

Mother's Day card made modern. For the passionate, go getter mom in your life! A free printable card from Pars Caeli.

I'm so glad that I was able to see my mother and mother-in-law this past weekend and celebrate together. Mothers are such an important part of our lives, and I'm grateful to have such examples to follow!


What would you create with a Sprout?


#Mother

Motherhood has been on my mind more than usual. With pals becoming new moms, turning the page onto a new decade myself, and Mother's Day upon us, I've been seeing motherhood from a lot of different angles.

Join our Mother gang because mothering is hard enough without friends. In love and support of all mothers.

Join our Mother gang because mothering is hard enough without friends. In love and support of all mothers.

I will not judge; I will love instead.

I've always wanted to be a mother and pictured myself as one. I've been formulating what that picture looks like since I was a little girl. In many ways, all that I've learned, I learned through the lens of wanting to teach it to my future children. I have evaluated the world, other people, and myself through this lens of the best mother.

And in that light, I have critiqued other parenting styles and choices. And when I became a new momma, I was super critical of myself. Am I doing this right? Is she sleeping enough or too much? Should I be nursing more or less? Do I keep her stimulated or too much so? So many questions ran through my head, judging every move I made.

I will not judge; I will love instead.

We had our second child when our first was two, and I heard others judgments. Are you ready for another? How many are you going to have? I think two years is too close. I think two years is too far apart. How old are you now? Are you really going back to work?

Adding to my own self evals (that were still coming up less than glowing), I heard the voices of "them" - those people who don't really matter in our regular lives but we somehow give power to when we're making important life choices.

I will not judge; I will love instead.

I'm a mom, three times over now. My oldest has been on this earth a decade now, and my youngest can speak in paragraphs. My inner critic is quieter or has a better sense of humor. And the "them" have evolved with new faces and new questions/advice/unhelpful observations.

And I see moms making the same, the opposite, or slightly similar choices to my own. And whether it be my age, my faith, my exhaustion, or my wisdom...

I just want to love them.

To walk up while they are fighting with the onesie diaper change. To high five while they're trying to wrestle with the toddler in the carseat. To hug when the child screams loudly and repeatedly in the middle of Church. To offer knowing respect when the tween spouts off disrespect. To hold hands as the middle schooler takes first steps into high school. To hold our breath on the first night that curfew is actually used.

I will not judge; I will love instead.

You always wanted to be a mom.

You weren’t sure you wanted children.


You work.

You stay at home.

You do both.


You cook.

You have the pizza guy on speed dial.


You breastfed.

You bottle fed.


You craft the day away.

You buy pre-made Valentines.


You lost the baby weight.

You just call it weight now.


You think motherhood is rewarding.

You think motherhood is challenging.

You think both.


Yet...

We are paralyzed by the thought of them growing up.

We worry if they’re getting enough vegetables.

We cry.

We wish for just five minutes of silence.

We fear we aren’t doing it right.

We understand our own mothers now.

We yearn for unsolicited hugs.

We feel guilty.

We stand in awe at their accomplishments, big and small.

We grieve when another has lost a child. 

We love hard.

We have a common thread.

And it is #mother

I'm joining in the #MotherMovement. It's an effort begun by Sara Moore, and it begins with the statement above called the #MotherManifesto. It's a commitment to lift up all mothers. To stop the mommy wars and the bickering. To support. To listen. To love.

I will not judge; I will love instead.

There's a lovely Mother Gang of incredible women steering the ship, and we'd love you to join in. You're a #motherlover, aren't you? We're real people who find mothering hard and amazing and exhausting and worth it.

Head over to Mother Manifesto to read more about this movement!! You'll see more about it here on Pars Caeli over the next months. And we have a pretty kicking giveaway coming up next week, too.

Put aside your differences to lift all mothers up and support them in whatever way they need.  Commit to the #mother community, to the village we always hear about, that we all need as mothers to make it through with our sanity.

Put aside your differences to lift all mothers up and support them in whatever way they need.  Commit to the #mother community, to the village we always hear about, that we all need as mothers to make it through with our sanity.

JOIN OUR MOM GANG. BECAUSE MOTHERHOOD IS HARD ENOUGH WITHOUT FRIENDS.

And to all mothers out there, you are loved.

xoxo, MJ

DIY Children's Hand Dish
A sweet, homemade gift for mothers and teachers! Make this one with your child from air dry clay.

A sweet, homemade gift for mothers and teachers! Make this one with your child from air dry clay.

Children's handprints are such a lovely way to capture the littleness of childhood. As a mom, I save all of the construction paper tracing and funny animal crafts that come home using my children's hands. I just love them!

When my friend Jeran, posted these fabulous photo holders made from air dry clay, I immediately thought of my children's handprints! I wanted to create with these small shapes in such an easy medium. And then the usability of a small dish evolved as we were playing with the flexibility of air dry clay.

A sweet, homemade gift for mothers and teachers! Make this one with your child from air dry clay.

A sweet, homemade gift for mothers and teachers! Make this one with your child from air dry clay.

I purchased Crayola's tub of clay to give it a roll. First we took about a baseball-sized ball of clay. It's softer than potter's clay and easy to manipulate. Using a rolling pin, we flattened the clay and traced out L's hand with a pencil on the clay.

He removed his hand, and I carefully pulled away the excess clay. If you're trying this, make sure that you have clay rolled out to about 1/4 inch in thickness. Too flat makes the hand plate too flimsy and too think makes the fingers hard to move. Using a spatula, I lifted the palm and fingers to allow them to dry on an armature for shaping.

PC_childrenshanddish_1.jpg

I'm all for working what you have so I grabbed some unused measuring spoons to prop the clay into the bowl-like shape I wanted. Follow the instructions on the container to make sure that it's dried completely before you move it. You'll notice that it turns more bright white as it dries.

PC_childrenshanddish_5.jpg

My children loved seeing their hands as art! And they thoroughly enjoyed making an object they knew their teachers and grandmothers would use on their desks or dressers.

A sweet, homemade gift for mothers and teachers! Make this one with your child from air dry clay.

A sweet, homemade gift for mothers and teachers! Make this one with your child from air dry clay.

Have you worked with air dry clay? You should give it a whirl if you haven't yet!

xoxo, MJ

How to Recover from Vacation
Re-entry back to reality is never easy. Here are a handful of practical tips to get you enjoying life at home again.

Re-entry back to reality is never easy. Here are a handful of practical tips to get you enjoying life at home again.

A fabulous trip away to somewhere tropical/relaxing/exciting/adventurous that made you feel ecstatic/in love/rejuvenated/calm. And now you have returned home . . . but almost all of you wants to be away and still on vacation. Don't get me wrong, home is where the heart is, but sometimes that heart needs a change or a rest.

Today, I'm writing this post for me and for you. I've had this blog window open, ready to write all about how I bounced back into real life, since we, my husband and I (sans kids) returned from a whirlwind trip to New York City with friends nearly ten days ago. My pal, Emer, and I had always imagined that we'd celebrate our 40th birthdays in NYC together. Emer and I are long-time friends, but an ocean has kept us away from frequent visits, she being a native-born Irish beauty, now living back home, married, with three little boys. However, all the planets did align, and we were somehow able to make a grand double date of a 3-day weekend and take on the town.

So, in writing this for the both of us, I did some searching around to see how other good people kick themselves back into gear. The Happy Gal has ideas for how to keep your family on track and your home in order before and after vacation. These are awesome and ambitious. Road Warrior Voices has a great idea to return from your trip a day early to give yourself time to do laundry and to ease back into routine. The site has a useful list of ideas for longer vacations but one not quite as practical for a long weekend vacation.

Here are my top four ideas to get you back into your groove after a wonderful time away:

1. Remember that this does not have to be the only trip and plan for the next:

Perhaps you might be feeling a sense of disappointment, the post-Christmas blues sort of feeling, that now the time you'd be looking forward to is over. Plan the next time for wonderful! Whether it's a 2-week international excursion or a quick roadtrip away, give yourself something new (and doable) to look forward to! It's good for the mojo and keeps you pushing forward, rather than looking behind.

2. Capture a memory or experience in a special way and keep it in front of you:

Souvenir shops are big money makers for a reason! Whether you found something(s) precious on your journey or snapped oodles of photos, make sure that you put those reminders in prominent places in your life. By this I DON'T mean your display shelf. Pop a silly photo in your wallet or pin the cute card to your bulletin board at work. Walgreen's has great deals on black-and-white, super large prints if you want to plaster something large on your wall. Chatbooks are my new favorite way to capture your Instagram photos in a beautiful way!

3. Get (back) to sleep and healthy eating:

Upon returning home, I was hit with a sinus infection *BOOM* which, in turn, prompted me to eat less healthy (what, Sonic burgers don't cure sinus headaches?). Being under the weather did force me to sleep more, which was helpful as I don't sleep much before trips (trying to get everything together) or on them (trying to enjoy every moment). I also allow myself to indulge in high calorie decadence when I'm traveling so I usually come home feeling full-er than I left so returning to salads and green smoothies has helped everything feel back on track.

4. Find small ways to relive the experience and share it with those around you:

What was the best part of your trip? The deep sea diving? The long stroll along the river bank? The amazing book you were finally able to read? Share those!! While no one REALLY wants to see all of your vacation photos, your coworker might be looking to hear about a great, new location to visit or your neighbor enjoy the book recommendation. And seeing them experience something you loved helps amplify the joy of the journey, too. Even simple things like texting a photo of your vacation time together can help transport your loved one back to a beautiful memory.

When was the last time you spent some time away? Even if it's only for an afternoon, you'll be surprised by how much joy you can sustain from the experience!

xoxo, MJ

How I Donate Life: An Interview with Kelly from Cloudy Day Gray

The above photo is me as a brand new momma, with my 2-day old, first born daughter. She's giving me the exact expression that I'm thinking in my head. Those early days of life are so fragile, so dear to me. 

April is Donate Life month, and I'm delighted to have my friend, Kelly from Cloudy Day Gray here to share her story. Though I'm in full support of organ donation, I've never had to think about pediatric organ donation and the 1,900 children in the United States that await an organ right now. I'm joining in Kelly's efforts to show how we live and donate life every day with our children and families in hopes of spreading awareness about pediatric organ donation. Won't you join in by tagging your photos #HowIDonateLife?

Here's Kelly...

Before my daughter Matilda was born, I didn’t know anything about pediatric organ donation. I had never really considered the fact that children even experienced organ failure. And, I certainly had never considered the fact that the organ donors may need to be children themselves. These aren’t the things that parents want to think about.

That first week home with Matilda was full of the sweetest moments snuggling close, but it was also full of more worry, concerns, and self-doubt than I ever remembered having with my first. After three doctor visits, a late night trip to the ER, a transfer to a children's hospital, and the longest ambulance ride of my life to NYC, Matilda was diagnosed with acute liver failure, put on life support, and placed on the organ transplant waiting list.

I took Matilda's tiny hand in mine that night and whispered to her all my hopes and dreams. Our life took a dramatic shift, but I knew it was my job to learn, cherish every moment, and move forward with every breath - hand in hand.

The five long weeks we waited for an offer were the most challenging of my life. The endurance and pain of waiting was to be expected – I had my faith for that. But, there was so much more than just the wait. It was the separation from my son, the long nights at the hospital bedside, the alarms sounding constantly, the moments holding our breath when death was near. It was learning what everything meant – all the medical terms, the decisions, the side effects, and countless unknowns.

But, during that time my eyes were opened.

My priorities re-adjusted.

My goals broken down.

My heart opened.

I saw more kindness than I ever expected. I felt more strength than I knew existed within me. All of my emotions were amplified and for the first time, life felt simple. My goal each day was to show as much love to Matilda as possible - and that was enough.

Everything was being done medically to keep Matilda alive, but without a new liver we were urged to say goodbye. With lots of prayers and sweet lullabies, we made molds of her hands and feet, read her all of her brother's favorite stories, and promised to never give up hope. That very night, Matilda received an offer.

She received her liver transplant on her six-week birthday. While it was extremely risky due to her age and size, everything went smoothly. The surgeons were amazed that she was still alive because only 2% of her original liver was still functional. The gift from a two-week-old really was Matilda's only chance at life. A life full of joy, laughter, and zest.

This isn't the life I expected for my daughter, but it is the most beautiful life I have ever known.

Please join me as I gather 1,900 photos on Instagram to bring hope to the 1,900 children, just like Matilda, who are currently waiting for that same chance at life. Follow this link to learn more and get involved.

Three-Year Blogiversary + A Giveaway

Happy happy days are here!! Pars Caeli is a big three years old. By blog standards, Pars Caeli is an old gal now (9 months being the average lifespan of an active blog), and I can't help but reflect that she's just getting better with age.

As a way of thanking you beautiful people for joining along in any and every part of this journey, I have a fun giveaway of one of The Bannerie's glittery banners. In fact, I treated myself to a few banners that express in gold and glitter just how I'm feeling as we embark on another year of projects, collaborations, reflections, and musings. Here are my top three learnings as we embark on a new year!

We're only here once so let's love big! Boss babe banner by The Bannerie.

We're only here once so let's love big! Boss babe banner by The Bannerie.

1. LOVE BIG

I feel pretty strongly on this one in the whole vein of "shower the people you love with love" kind of way. And I love that this blog has given me the kind introduction to a ton of wonderful people. And I've been able to help them with their dreams, and they, in turn, have boosted my goals, too! I feel so fortunate to be able to shine big, bright spotlights on talented makers producing wonderful projects, great pieces of literature, and clever perspectives on the world.

I have a ton of projects that I want to accomplish, and I love that this space is one for me and for others, where we can throw love over all kinds of greatness.

I plan on loving bigger and better as we embark on this third year!

Sparkle messages from The Bannerie: Kind over Nice

Sparkle messages from The Bannerie: Kind over Nice

2. KIND OVER NICE

As much as I've loved highlighting and sharing others work, I've learned through collaborations that kindness always matters more than niceties. By that I mean, truly caring for the people with whom you work and genuinely looking to help them in real and powerful ways means so much more than the one off retweet or like here or there.

I'm always up for meeting new people, but I'm sure to keep supporting those whom I've known and trusted. As a "veteran" blogger, I want to help others through the meandering path of success but only in authentic and real ways. Far too many of us use the internet as a place where we are not ourselves, the comment or express emotions that are stronger than what we would deliver in person. And in year three, I'm up for making more kind connections and sincere gestures of support.

You got this. And you need a banner to remind you. Giveaway happening on Pars Caeli!

You got this. And you need a banner to remind you. Giveaway happening on Pars Caeli!

3. You got this

No, really, you do. I'm grateful that three years of blogging have brought me to here. I've got this. My own brand of fun, whimsy, crafty, mothering, project-making goodness. And you have your own list of comma-spaced awesomeness. And there is space, plenty of space, for both of us.

Pars Caeli has shown me that there are like minds all over the world, and now we have a venue for high fiving and patting each other on the back. And even kicking each other in the pants when necessary.

I want to give you one of The Bannerie's best selling banners with just this message! YOU GOT THIS! I have mine hanging in the studio right now. It's a super helpful mantra for those times when more than my fair share of doubt might creep in.

The Boss Babe banner giveaway is on until Sunday. And it's very easy to enter!! Pass the giveaway along to someone else as a fun gesture to show your love in big ways.

Thank you for joining in this journey and for celebrating the everyday kinds of wonderful that make life amazing. Can't wait to step into year three!

xoxo, MJ

Great Finds: Happy Handmade
Happy Handmade is a fantastic resource for any rainy/summer/snow day crafting with your children with 115 pages of fun projects made from materials you already have!

Happy Handmade is a fantastic resource for any rainy/summer/snow day crafting with your children with 115 pages of fun projects made from materials you already have!

Are you looking ahead to summer activities? What will the kids be up to this summer? I am busily planning away, both for my own spirit as well as the necessary planning for my kids' camp and other adventures. It's right about this time of year that we begin as a family talking about what each persons wants to do over the summer.

In the minds of a 10-, 7-, and 5-year old, summer can still feel very distant. Last year I created this printable as a conversation starter. We're a pleasant mix of introverts and extroverts so I wanted everyone to have some time to think in their own time about the weeks of possibility ahead.

Use this free printable to find out just what your kids WANT to do this summer. A great tool for a happy summer for all.

Use this free printable to find out just what your kids WANT to do this summer. A great tool for a happy summer for all.

As part of our Mommy and Daddy school every summer I'm really looking into diving head first into a new book from one of my favorite creative moms, Michelle of MollyMoo Crafts. A quick digital download with 115 pages of projects that are easy enough for me to love, and original enough for all my children to get excited.

Happy Handmade is a MollyMoo book, in collaboration with 17 international crafting moms. It is packed with happy and imaginative crafts. My very favorite aspect of all MollyMoo projects is that they cost next to nothing because they are made from recycled materials, cardboard or scraps of fabric and wool. I don't have to search craft and specialty stores to find exactly what I need; supplies are readily found in a busy household.

You can explore all these areas with beautiful photographic tutorials alongside:

  • Recycled Crafts
  • Paper and Cardboard Crafts
  • Felt and Sewing Projects
  • Handmade Toys
  • Pom Pom Crafts
  • Nature Crafts

I'm planning on making this awesome rocket with my little guy. I have a feeling he'll want to create his own fleet of spaceships once we get started.

Happy Handmade is a great resource to have around for any time! Download your copy of Happy Handmade here today!

Tell me, where do you turn when you're looking for productive and imaginative activities for your children?

xoxo, MJ

Make Your Own Stamps
You can use found objects to create fun stamps for any kind of project! Pin this one for later.

You can use found objects to create fun stamps for any kind of project! Pin this one for later.

Stamps are a great addition to every creative toolbox. They can be pricey to accumulate unless you're willing to explore some simple techniques for making your own unique stamps.

We love making our own wrapping paper and patterns using stamps - great expanses of open space along with total freedom of color and shape make for an easy recipe for success. Here are a few fun techniques to try with or without your kids:

Add foam circles to an empty tape roll for a fantastic polka dot effect.

Add foam circles to an empty tape roll for a fantastic polka dot effect.

Foam shapes make a great rubber stamp substitute. They won't last as long as the originals, but they offer a quick solution with super results. We used an empty tape roll and added foam circles of varying sizes for a polka dot pattern. You can carefully roll the tube down the paper or wear it on your arm for a fast tread of dots (a favorite with my crew).

Add foam stars to a ball for a fun rolling stamp activity.

Add foam stars to a ball for a fun rolling stamp activity.

For the smallest hands, we added some star shapes to a ball that can be rolled around for patterns and stripes. Rolling in ink is all kinds of messy fun!

For the more detailed oriented, grab a basic pink eraser or a stamp compound, and trace a design for your stamp. We transferred a simple ladybug image onto the stamp using tracing paper and a pencil.

With a carving tool, remove the part of the image that you do not want stamped. The ink will only adhere to the shapes that remain. Press your new stamp into an ink pad and repeat in random or ordered patterns! Enjoy the imperfections that come as you continue the process.

We love creating our own stamps! Have you ever tried it?

xoxo, MJ